The eSIM is a weird technological marvel. Where a SIM (Subscriber Identity Module) is now a baby-fingernail-sized piece of plastic (Nano SIM) with a few circuits within it, an eSIM is the virtual equivalent that’s handled entirely within software. When you want to add or change a telephone carrier service plan, no more fumbling with the Nano SIM and dropping it into a crevice you’ll never retrieve it from. (Don’t ask.) Instead, it can be as simple as clicking a link or scanning a QR Code.
Modern iPhones (since the XR/XS series) and iPads (a more complicated mix of models) can support one or two eSIMs. But these eSIMs aren’t just a text file that’s loaded with settings. Rather, they’re actual programmable circuits within your iPhone or iPad.
When you want to reset or fully erase your device to hand it over to someone else, sell it, or recycle it if it’s too wonky to use, what choice you make can affect whether the eSIM remains in use for the next person who handles it. In most cases, you’ll want to delete all eSIMs. But there are exceptions: you may want to retain it if you’re transferring a data plan or even a phone number to another family member, or if performing a factory reset to try to solve a problem. (Note that deleting an eSIM doesn’t affect your subscription with a carrier—contact them to end or change service.)
Here’s the pathway to make sure you pick the right option in iOS 17/iPadOS 17, starting with Settings > General > Transfer or Reset iPhone/iPad:
- To erase just eSIMs: tap Reset, Delete All eSIMs, and follow prompts to complete.
- To reset the device to factory settings, which includes removing eSIMs: tap Reset All Settings and follow prompts.
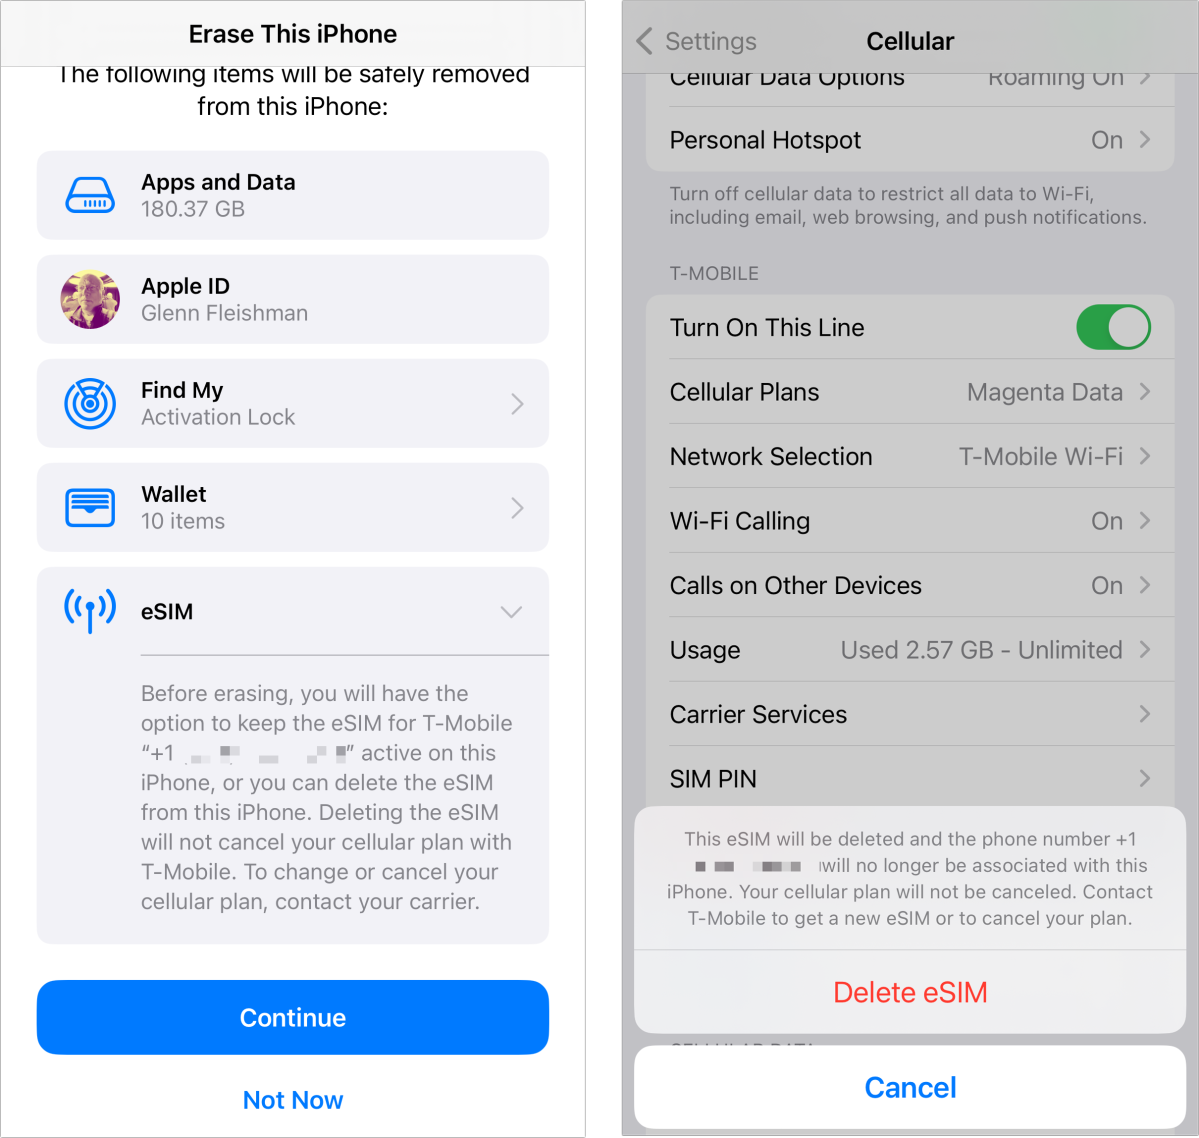
- To erase the device and leave it ready for use by another person: tap Erase All Contents and Settings and review the list display. One item will be labeled eSIM if there’s one or more installed. Tap it to see what will happen during the following steps.
If you pick the last item, erase the device, tap Continue, and then during the process in which your iPhone or iPad is wiped, you’ll receive a prompt asking if you want to retain or delete the eSIM or eSIMs. Make the choice at that point based on your needs.
You can take a preemptive step if you want more assurance by going to Settings > Cellular (iPhone)/Cellular Data (iPad) and tapping Delete eSIM beneath one or more eSIMs listed in your settings. By deleting at this stage, the eSIM won’t even be messed with when you factory reset or otherwise erase the phone.

You can use the pathway to erase settings (left) to delete an eSIM as part of the process or using General > Cellular (right) to delete an eSIM before erasing or resetting your device.
Foundry
In the event you make a choice during erasure or reset you didn’t intend:
- If you retained an eSIM: Go through the stages to set up the iPhone or iPad with all the default choices, go to General > Cellular, and delete the eSIM. Reset or erase the device again. Or, you can call your carrier and ask them to cancel the plan if that was your intent in any case. They will deactivate service connected to the eSIM.
- If you delete an eSIM you wanted to keep: After setting up the device or restarting it, navigate through the website of the carrier to find the tools for reinstalling the eSIM. You may need to call them to get them to send you an image via a text message or install their app for them to push a profile into it that you can then use.
This Mac 911 article is in response to a question submitted by Macworld reader Tom.
Ask Mac 911
We’ve compiled a list of the questions we get asked most frequently, along with answers and links to columns: read our super FAQ to see if your question is covered. If not, we’re always looking for new problems to solve! Email yours to mac911@macworld.com, including screen captures as appropriate and whether you want your full name used. Not every question will be answered, we don’t reply to email, and we cannot provide direct troubleshooting advice.

