It’s easy to wind up with multiple iCloud accounts. You could wind up using different accounts for different purposes or sets of machines and want to consolidate receiving email for all of them. Apple doesn’t offer an obvious way to add iCloud accounts just for email in the Mail app. (Any third-party app makes it easy.) That’s because Apple steers you to select iCloud as your account type in the setup process, and only then warns you that account would then be used for all your iCloud purposes, not just email.
There’s a way to do it that requires using an app-specific password, which is Apple’s term for a password used exclusively for email, calendar, and contacts access. This kind of password is required because all other syncing is locked inside iCloud.com’s secure and proprietary services. Email, calendar, and contacts rely on industry standards, and it’s common to use third-party apps with them. (This is also why Apple’s Advanced Data Protection for iCloud can’t secure those items using end-to-end encryption.)
Please note:
- You cannot add an iCloud account already being used on your device through this method—you have to enable regular iCloud email for that.
- You can only use your primary address. To find that, log into iCloud.com with the account, choose the Mail web app, and then click the Settings (gear) icon. Under Primary Address, you’ll see the email address you need to use below.
Here’s how to bypass Apple’s seeming blockage and add iCloud accounts for email in your Mail app.
- Start at appleid.apple.com with the account you want to add for email only.
- After logging in, click Sign-In and Security if it’s not highlighted, then tap App-Specific Passwords near the bottom of the set of options.
- If you see the button “Generate an app-specific password” click it; you should only see that if you haven’t created one of these kinds of passwords before.
- Click the plus (+) button to the right of the Passwords label.
- Enter a descriptive name to remind you later why you added this password, and click Create.
- You may be prompted with Sign In with Password. If so, click that button and follow the steps required to return here. You may also be prompted to just enter your Apple ID password and click Continue.
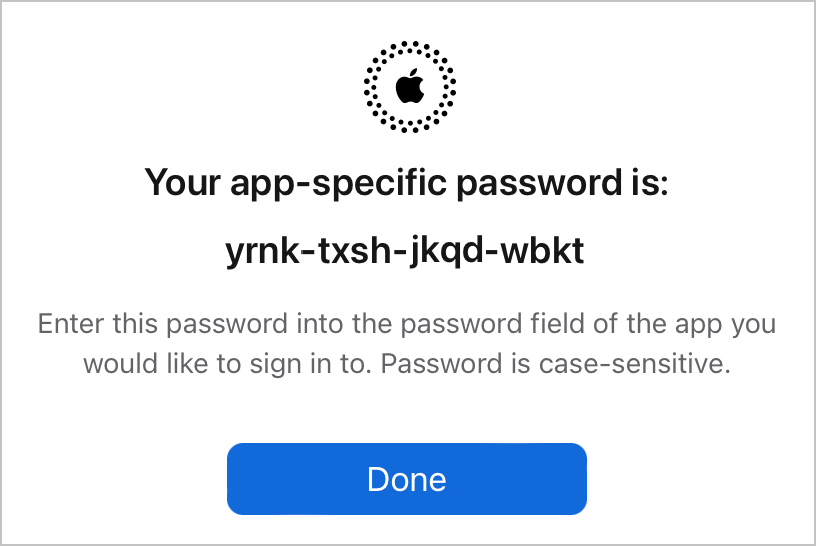
- Apple creates a password in a dialog that reads, “Your app-specific password is:
aaaa-aaaa-aaaa-aaaa”—four sets of four lowercase letters separated by dashes. Copy it or write it down, as once you click Done, it cannot be recovered. You must create a new one. - Click Done.

Copy the app-specific password generated at the Apple ID site.
Foundry
Now you can set up Mail.
In macOS:
- Launch Mail.
- Choose Mail > Settings/Preferences and click the Accounts button.
- Click the plus (+) button at the lower-right corner of the window.
- Select Other Mail Account and click Continue.
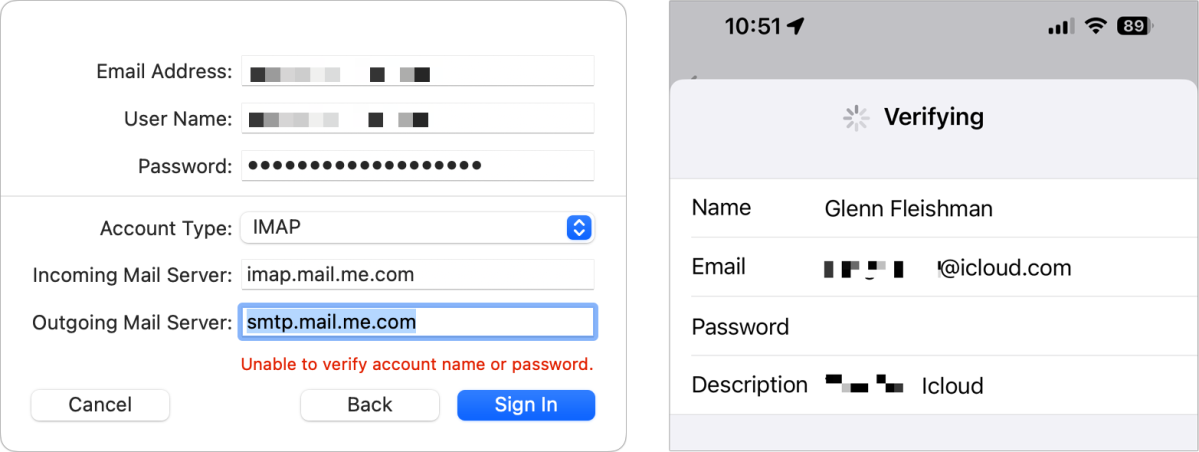
- Enter your iCloud email account name in the Email Address field and the app-specific password in the Password field. Click Sign In.
- Mail will be unable to verify what you entered, but that’s expected. In the dialog box that appears, enter your iCloud address in User Name. In Incoming Mail Server enter exactly
imap.mail.me.comand in Outgoing Mail Serversmtp.mail.me.com(no periods following). Click Sign In. - You may be told by Mail “Unable to verify account name or password”; click Next.
- Now you should see an “apps” dialog that has Mail and Notes checked. (You can opt to unclick Notes if you don’t want to sync those.) Click Done.
- You may be prompted one more time for the same password.
- In Accounts, you can now revisit and give the account you added a useful name in the Description field in the Account Information view for that account.

Enter login information in Mail for macOS (left) or Settings in iOS/iPadOS (right).
Foundry
In iOS/iPadOS:
- Go to Settings > Mail > Accounts.
- Tap Add Account.
- Tap Other.
- Tap Add Mail Account.
- Enter the details in the fields that appear, remembering to use the iCloud email account name and the app-specific password.
- Tap Next.
- You may be told the servers are not responding. If so, tap. OK.
- Tap Host Name under Incoming Mail Server and enter
imap.mail.me.comand then under Host Name under Outgoing Mail Server entersmtp.mail.me.com(no periods following). Tap Next. - In the screen headed IMAP, make sure Mail is enabled and tap Save.
If you run into problems, I found in testing that I only had to repeat the steps to achieve success—sometimes the settings didn’t “take” the first time, but identical entries worked the second time.
You can use the information above to set up iCloud email with any third-party email app, too. Once you’re set up, your linked iCloud email account will work within Mail or a third-party app just like your primary iCloud account’s email.
This Mac 911 article is in response to a question submitted by Macworld reader Steve.
Ask Mac 911
We’ve compiled a list of the questions we get asked most frequently, along with answers and links to columns: read our super FAQ to see if your question is covered. If not, we’re always looking for new problems to solve! Email yours to mac911@macworld.com, including screen captures as appropriate and whether you want your full name used. Not every question will be answered, we don’t reply to email, and we cannot provide direct troubleshooting advice.
