If your iPhone or iPad is misbehaving and initial solutions are not working, a full reset may be necessary. Taking your device back to how it was out of the box can often help resolve issues like constant crashing, freezing or other serious problems.
It’s something of a nuclear option, though, so before you take this route we’d recommend restarting or force-restarting your iPhone or iPad, as that will leave your data and settings intact. Another option is to ensure that the version of iOS or iPadOS on your device is up to date, as the problem might be caused by an issue that has since been patched by Apple. We explain how to do this in our how to update iOS guide.
Of course, if you’re selling your iPhone (or passing it down to a family member or friend) it’s absolutely vital that you delete all the sensitive data stored on it. If not, an unscrupulous buyer could gain access to your social media profiles, financial information and even your personal photos and videos.
As with any activity that deletes data, we’d recommend that you back up your iPhone or iPad before you attempt resetting the device. After your device has been wiped you will be able to download your data from your backup.
How to wipe an iPhone or iPad
We’ll concentrate on iPhone for this tutorial, but the steps will be more or less the same for iPad. There are two ways to erase your iPhone or iPad, one is useful if you just want to erase everything and then recover the data from a backup, the other is useful if you are moving to a new device and selling or passing on the one you are erasing. There’s also a basic Reset option that might be all you need to do in order to fix a troublesome issue.
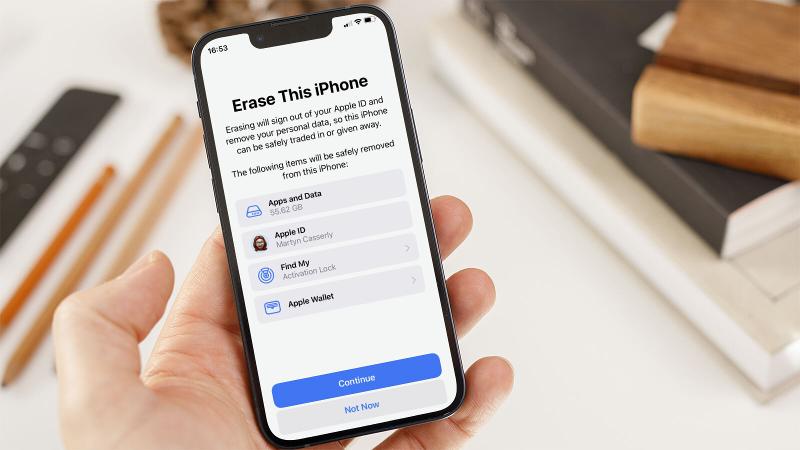
To factory-reset an iPhone follow these steps (after backing up your device).
You may need to remove your device from Find My before you begin. You will also need to be connected to Wi-Fi or cellular for this process to work.
- Go to Settings.
- Tap on General.
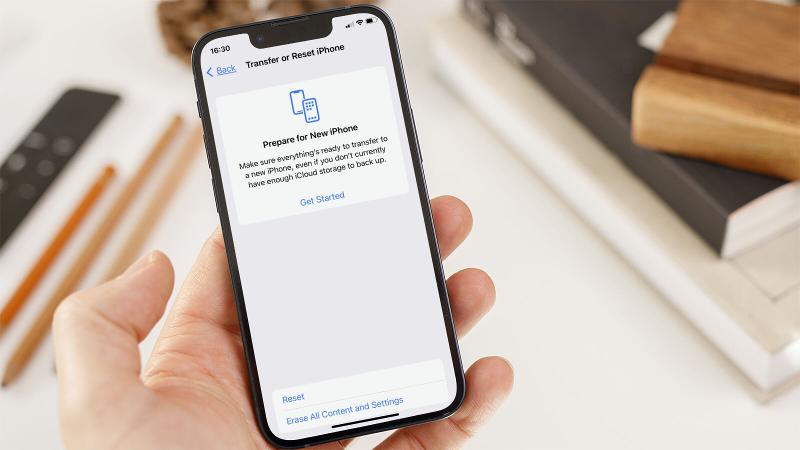
- Choose Transfer or Reset iPhone.
- You now have the options Prepare for New iPhone, Reset, and Erase All Content and Settings:
- Choose Reset if you just want to reset your settings. There are also options to reset network settings, reset the keyboard dictionary, reset the home screen layout, and reset location and privacy. These options may be enough to fix a problem with your iPhone without wiping it.
- Choose Prepare for New iPhone to backup and wipe your iPhone for sale, or so you can pass it on to someone else.
- Choose Erase All Content and Settings to completely wipe your iPhone and reinstall the operating system and everything else.
- The iPhone will alert you to what will be deleted, including Apps and Data and your Apple ID. Find My will no longer be connected to the device, and all your Apple Wallet details will be removed. This is your cue to back up any of this data (if you don’t have a backup we run through how to do that here: How to back up an iPhone or iPad.) You will also find options for backing up this information if you follow the Prepare for New iPhone steps below.
- If you are happy that you have a backup, or don’t need the data being referred to, either select Erase All Content and Settings or the Prepare for New iPhone option.
- Tap Continue.
- Enter the Passcode for the iPhone and the process will begin.
If you want help backing your data up to iCloud and want to make sure you cover all the important steps that you should make when selling your old device, you can make use of the Prepare for New iPhone instructions, which will walk you through the process.
How to reset an iPhone if you’ve forgotten the password or passcode
During the process for resetting you iPhone your passcode will be requested, you may also need to use the password associated with your Apple ID. This is a problem if you have forgotten it.
There is a workaround if you have forgotten your passcode, but remember your Apple ID password:
- On the Lock Screen, enter a passcode several times until you get a Security Lockout with a warning to try again later.
- You’ll see Erase iPhone (or iPad) at the bottom of the screen. Tap on that.
- Tap Erase iPhone/iPad and then tap it again to confirm.
- You’ll be prompted to enter your Apple ID password to sign out of your Apple ID on this device. This will allow you to reset the device and turn off Activation Lock.
- Tap Erase iPhone/iPad when prompted again to permanently delete all your apps and data and reset the device.
After a few minutes, your iPhone or iPad will restart and you’ll be at the setup screen, as if it was a new device you just took out of the box. For obvious security reasons, there’s no way to reset your iPhone after a lost passcode without erasing all your apps and data. It would provide an exploitable loop for bad actors to get around the passcode timeouts and such. But as long as you back up your iPhone regularly (either via iCloud or with a connection to your computer) it shouldn’t be too onerous to start over.
Resetting without a password used to require plugging into a computer via USB, entering iPhone recovery mode…it was a whole process. The good news is, Apple made this a lot easier as of iOS 15.2 (and iPadOS 15.2). So, if your device is running that version or later you can follow the steps below (otherwise click on the link above to reset via a computer). If you have forgotten your Apple ID password read this for help: How to reset Apple ID if you forgot the password.
How to restore an iPhone
If, having erased the content of the phone, you intend to keep using it, you can restore the content to your phone from your backup – assuming you have one, if not check out the section below. Here’s to recover your iPhone or iPad data:
From an iCloud backup
With the factory reset completed you’ll need to go through the setup of your iPhone again from the beginning:
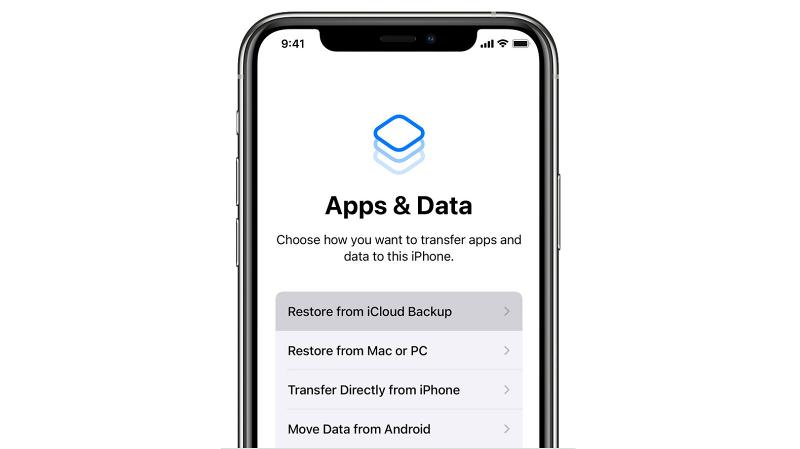
- Follow the onscreen instructions until you reach the page with the headings ‘Apps & Data’.
- Here you’ll see four different options from which you should select Restore from iCloud Backup.Sign into your iCloud account then select the backup you want to restore.
- You may be prompted to sign into various apps that you’ve already purchased, but other than that the process should now be pretty much automatic.
- Obviously, this could take a while if you have large backups or a slow internet connection, so don’t attempt this if you’re in a hurry. When the backup is completed your iPhone will reboot, and then it will start the larger job of downloading all of your apps.
From a Finder or iTunes backup
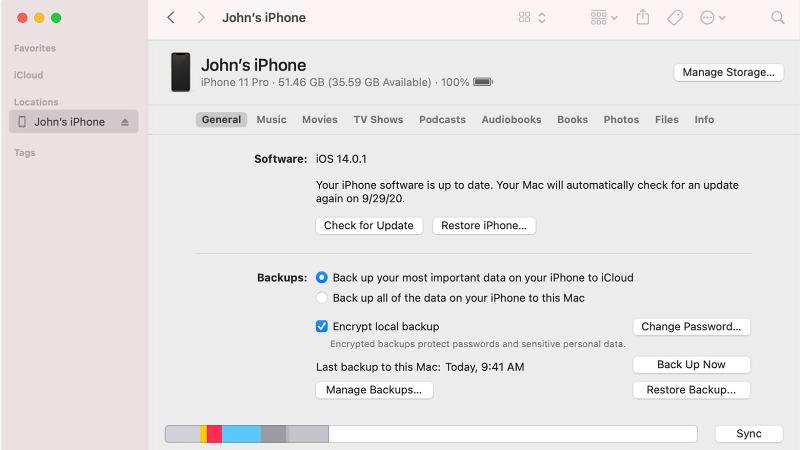
Depending on the version of macOS you’re running, you’ll either be able to use Finder (macOS Mojave and later) or iTunes (macOS Catalina or earlier) to restore a backup.
- Connect your iPhone to the Mac or PC.
- In the Finder window (or iTunes) you should see your device listed in the left column. Select it, then click on Restore Backup.
- Choose the backup you want to use, then click Restore.
- The process should now automatically install the backup on your device.
What to do if you didn’t back up your iPhone before you wiped it
If you didn’t backup your iPhone or iPad first, it’s likely that you won’t be able to retrieve data once you have deleted it.
The data on an iOS device is automatically encrypted, and wiping the device destroys the encryption key, making it more or less impossible to get anything back when it’s been fully erased and reset without access to a backup.
In an emergency you could try speaking to someone at an Apple Genius Bar, but it’s a long shot to say the least. (This applies to a full erase/reset, mind you – in other circumstances, such as data corruption, a malfunctioning device and so on, the experts may be able to help.) This also reinforces our frequent advice to back up regularly.
If you’re worried that your iPhone or iPad wasn’t backed up, don’t give up hope: there’s a chance there may be a backup of which you’re unaware.
To find out if you’re backing up to iCloud follow these steps:
- Open Settings.
- Tap on your name at the top of the screen.
- Choose iCloud.
- Now tap on Manage Storage. Here you should see an entry called Backups with the amount of data it’s taking up displayed to the right of the name.
- Tap this and you’ll see all of the various backups for your iOS/iPadOS devices.
- Find the most recent backup you have and tap on it.
One of the backups should say that it is This iPhone or This iPad. Tap on that and you can see what is, and isn’t being backed up. You can basically turn things on and off so that they don’t take up your full free 5GB iCloud allocation, or you can pay a few dollars/pounds a month for more storage.
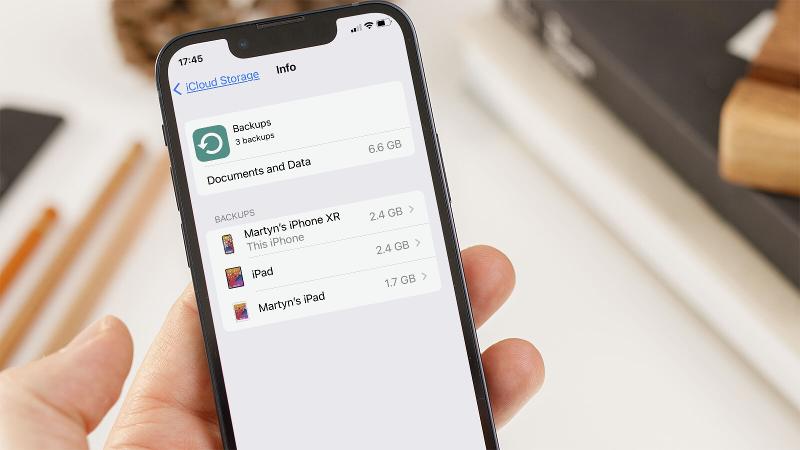
If you don’t see a backup from the device you were hoping to recover, but you do have backups of other devices (perhaps you have an iPad backup, but not an iPhone backup) you should be able to recover some of your data simply because once you link your iPhone to your iCloud account the shared data should be available on your iPhone.
If you weren’t backing you iPhone up to iCloud we suggest you do! Read How to back up an iPhone or iPad or follow the steps below.
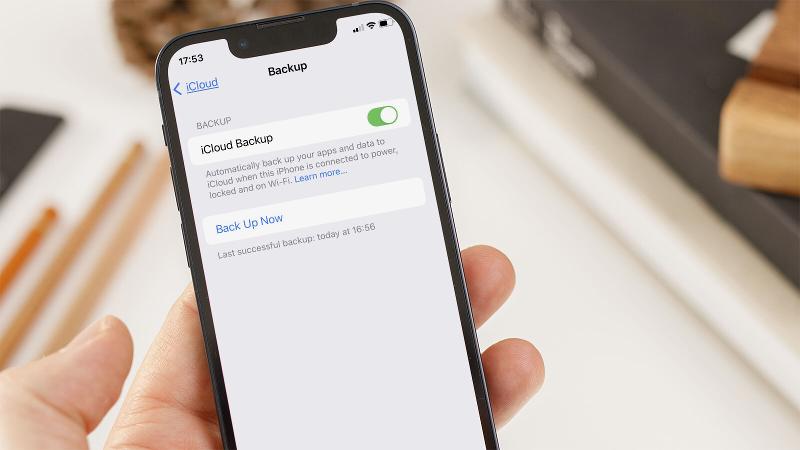
- Open Settings.
- Tap on iCloud.
- Find iCloud Backup and tap on it.
- Now switch the slider beside iCloud Backup to on (green).
- Tap Back Up Now. It may take a while, so bear in mind that your iPhone needs to be plugged in for the whole time.
If the backup is going to take ages you can reduce the amount of data being backed up. For example, you may think that some of the apps don’t need to be backed up; after all, you will be able to download them again from the App Store as you already own them. But note that the data may include saved data for games, and other settings and preferences you would prefer not to lose.
There you have it. A quick guide on resetting your iPhone and then restoring it once more. Of course, if you’re moving on from that older device and fancy something newer, be sure to read our best iPhone deals roundup to see if you can save some money in the process.


