As many of us now find ourselves working from home, being able to meet online with colleagues and friends to discuss projects, update on current events or just hang out and chat is becoming a necessity. One of the most popular services for doing this is Zoom, as you can have a multitude of people on any one call, and it has a very usable tier that is completely free.
In this article we show you how to get Zoom up and running on your Mac and try some of the features it has on offer.
Install the Zoom app on your Mac
Before you can start using Zoom, you’ll need to sign up for a free account and download the macOS app. It’s not currently available in the App Store, so you’ll need to visit www.zoom.us and click on the Sign Up, It’s Free button in the top-right corner of the screen.

Fill in the details, including your birth date and work email address, then click the Sign Up button. This will send a confirmation message to your email address, so once it arrives click the Sign In button and you’ll be taken back to the Zoom site where you can enter your details once more to complete setting up your account.
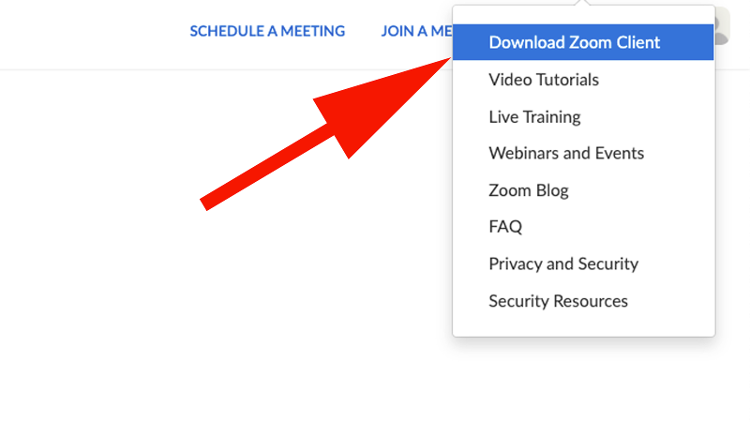
Before you can begin making or joining meetings, you’ll need to install the desktop app. You can either do this clicking on the Resources tab in the top-right corner of your account page then selecting Download Zoom Client or going directly to the Zoom client download page.
When the client has finished downloading, it will leave you with a zoom.pkg file in your Downloads folder. Double-click on this and follow the instructions to install the software.
If your security settings prevent you from installing the Zoom app, this doesn’t mean that anything is wrong, just that Zoom isn’t available in the App Store. Read How to open a Mac app from an unidentified developer to get around this restriction.
Once you’ve installed the app, launch it and you’ll be presented with the main screen. That’s it: you’re ready to start talking.
How to use Zoom on Mac
The main Zoom Home screen is comprised of four large buttons and a calendar where upcoming scheduled meetings are displayed. The buttons are New Meeting, Join, Schedule, and Share Screen. They are pretty self-explanatory, but here’s how to use them.
New Meeting
As the name suggests, this is where you would start a new call. You’ll notice that this button has a down arrow after it, denoting that there is a drop-down menu with additional options. Clicking on the arrow gives you two choices: Start with video and Use my Personal Meeting ID (PMI) with the number displayed below.
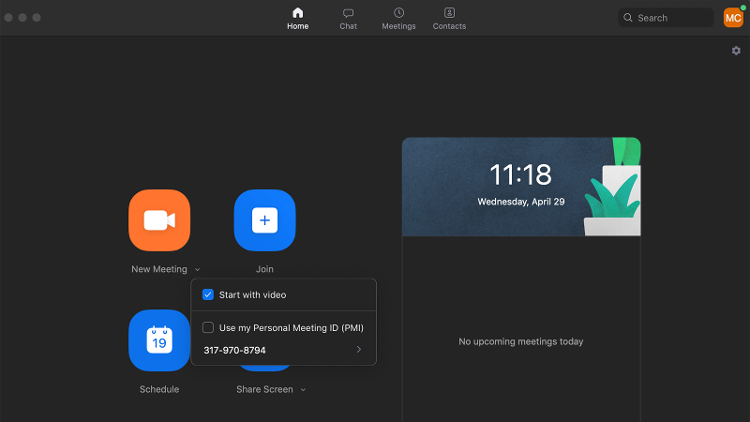
Start with video is usually turned on by default, as Zoom is primarily a video-calling platform, but should you prefer to control when and if you share video with others then you can untick the box. Of course, there are easy-to-access controls within Zoom that allow you to toggle the video on and off during a call.
Use my Personal Meeting ID (PMI) is a little different, in that it uses your Personal Meeting Room, something that Zoom says is best reserved for instant meetings with people with whom you converse regularly. It’s perfect for a quick call with colleagues, as they can join the meeting at any point just by inputting your Personal Meeting ID.
Clicking the New Meeting button itself creates a new call. You’ll most likely be asked to grant permission for Zoom to use your camera and computer audio, so agree to this and you’ll be ready to start your first call.
On the screen you’ll see yourself, as viewed by your camera, and moving the mouse reveals a range of options along the bottom of the screen. From the left these are as follows:
Mute – turns off your microphone.
Stop Video – turns off your camera.
Security – allows you to lock the meeting so other people can’t join, use the Waiting Room (so each new attendee has to approved by you), plus various features that attendees are able to use in the meeting.
Participants – Allows you to invite people to the meeting, mute particular attendees or mute everyone.
Share Screen – Switches on the presentation mode so that everyone on the call can see what is currently displayed on your screen.
Record – Make an MP4 video of the call.
Reactions – Emojis that can be used in the call.
How do I invite people to a Zoom meeting?
With your call up and running after clicking on the New Meeting button, you’ll want to add more people so you can actually talk.
To do this, click on the Participants tab and a side window will open on the right. At the bottom you’ll see the Invite button, so click this and you’ll see a new box into which you can type the name of your contacts (if you’ve entered any into the Contacts section of your Zoom account, which can be found by selecting the Contacts tab at the top of the page on the Zoom Home screen) or there’s another tab to send invites via email.
Choose whichever is the one that you deem most suitable then wait for the invitees to respond.
If you’ve turned on the Waiting Room setting (you’ll find this by clicking the More button to the right of the Invite button or the Security tab under the main pane), you’ll be notified as each invitee logs in and be asked to let them join the meeting. Once this is done, you’ll see them appear on your main screen next to your own video feed.
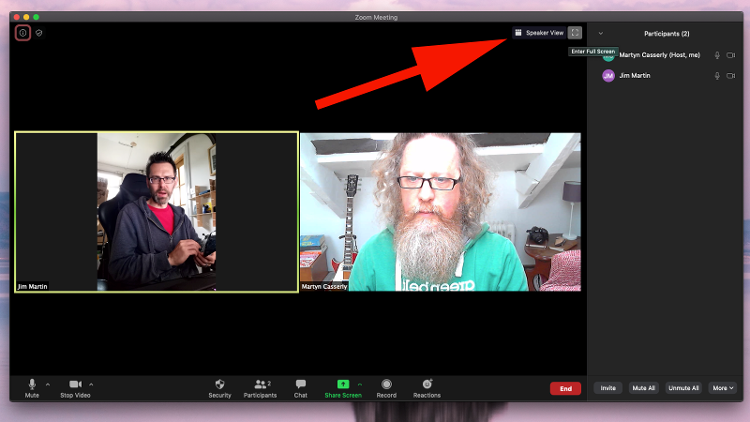
In the top right of the screen you’ll see either Gallery mode or Speaker mode. Clicking on this will allow you to switch between the two. Gallery Mode creates panels so you can see all the people on the call, while Speaker mode will make anyone who is talking the main video seen by everyone.
If you’re having problems with poor quality visuals, then read How to improve video quality on Mac for a few tips.
How do I share my screen in Zoom?
If you want to share a graph, image or any other kind of media with everyone, click the Share Screen tab. This opens up a menu where you can either select from a range of options, including your Mac display, which could be useful if you want to take people through a demo of a website or how to do something on your computer, a virtual whiteboard that you can draw on in real-time, iPad or iPhones that can connect via a cable or AirPlay, or any particular open application you currently have on your Mac.
Simply highlight the one you want to use, then click the Share button in the lower right corner.
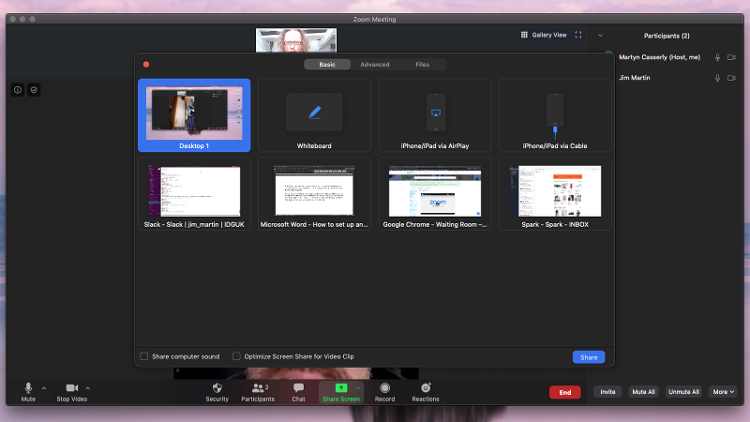
Now all the participants will view the contents of your screen, just as you see it. When you’ve finished, click the Stop Sharing button at the top of the page and you’ll return to the normal meeting mode.
How do I share documents in Zoom?
If you want to share documents with everyone, you’ll need to use the Share Screen button again, but this time when the menu appears click the Files tab at the top. Now you can use either Google Drive, Box or OneDrive to share your file with the participants.
How do I change my background on Zoom?
You may have seen people on Zoom calls that have either blurred out the background or added more exotic locations via wallpaper images. This is actually quite easy to do.
Go up to the menu bar at the top of the screen and select Zoom.us > Preferences > Virtual Background. Now you can either choose one of the images that Zoom provides for free or click the ‘+‘ button and add your own.
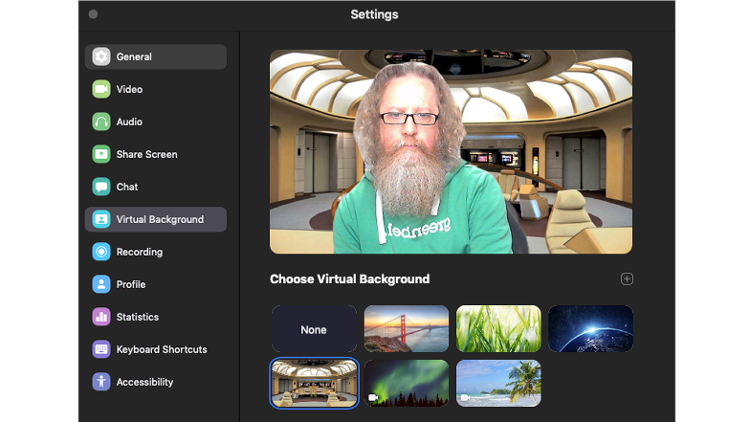
The first time you do this, Zoom will prompt you to download the smart virtual background package, so click Download and in a few seconds your new virtual background will appear behind you. If you want to return to normal, go back to the settings and select the None option.
How do I join a Zoom meeting?
Once you’ve received an invitation via email then you just have to click on the link and the Mac app should launch automatically. The other option is to open the app, click Join, then enter the Meeting ID or Personal Link Name that you’ve been provided.
How do I schedule a Zoom meeting?
Scheduling a meeting on Zoom is similar to booking a conference room at the office, in that you’ll still need to invite people afterwards.
Open the Zoom app and click on the Schedule button. This opens a new menu where you can enter the topic of the meeting, date and time it will be held, password for joining, the kind of calendar app it will use to create the appointment, plus a few other basic settings for the type of devices that can connect and whether you use your personal ID or have Zoom generate a disposable one.
When you’ve set things up how you want them, click the Schedule button.
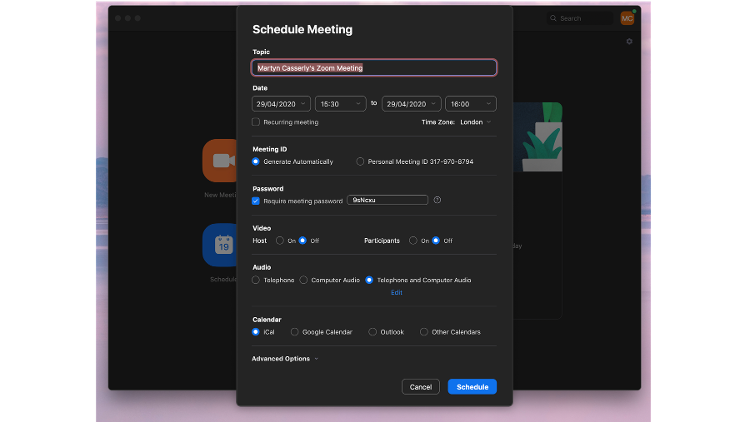
You’ll see the meeting now displayed in the calendar on the Zoom app front page, along with the Meeting ID number. Next to the meeting heading you’ll see three dots in a box. Click this then choose the Copy Invitation option.
The last step is to create a group email that includes all of the people you want to attend the meeting, then paste the copied invitation into the text box. Send the email and everything should be in place for your future meeting.
Annoyed by the 40-minute time limit?
Most people use Zoom’s free tier, but this doesn’t let you have chats of more than 40 minutes. Occasionally you’ll get lucky and the app will announce that it’s going to let you carry on anyway, but more often it will dump you out.
There’s a workaround you can use here: the trick is to schedule a meeting with a link, which lets everyone jump straight back in after the time limit expires, with almost no disruption. It’s not perfect, but it’s better than the alternative. We explain this workaround here: How to get around Zoom’s 40-minute time limit on Mac.
There you have it, a guide to the basics of using Zoom. Of course, there are other services also available, so be sure to read Best video-conferencing apps on Mac to see if they would be better suited to your particular needs.

