So you just unboxed your brand-new iPhone. Maybe it’s the first one you’ve ever had. Maybe you’re replacing an older iPhone that has seen better days. Maybe you get an iPhone every year.
Whatever the reason, you will enjoy your time with your new phone so much more if you spend a little time learning some tips and tricks. Some of these you may know, others you may have never heard of, but they all make life with an iPhone a little nicer.
Want to transfer your data from your old iPhone? Read iPhone setup guide: How to transfer iPhone to iPhone.
Choose a safe password
Foundry
It’s boring but important: While you can unlock your iPhone with your face or finger, your iPhone is only secure if nobody can guess your passcode. If it’s 123456 you’re asking for trouble.
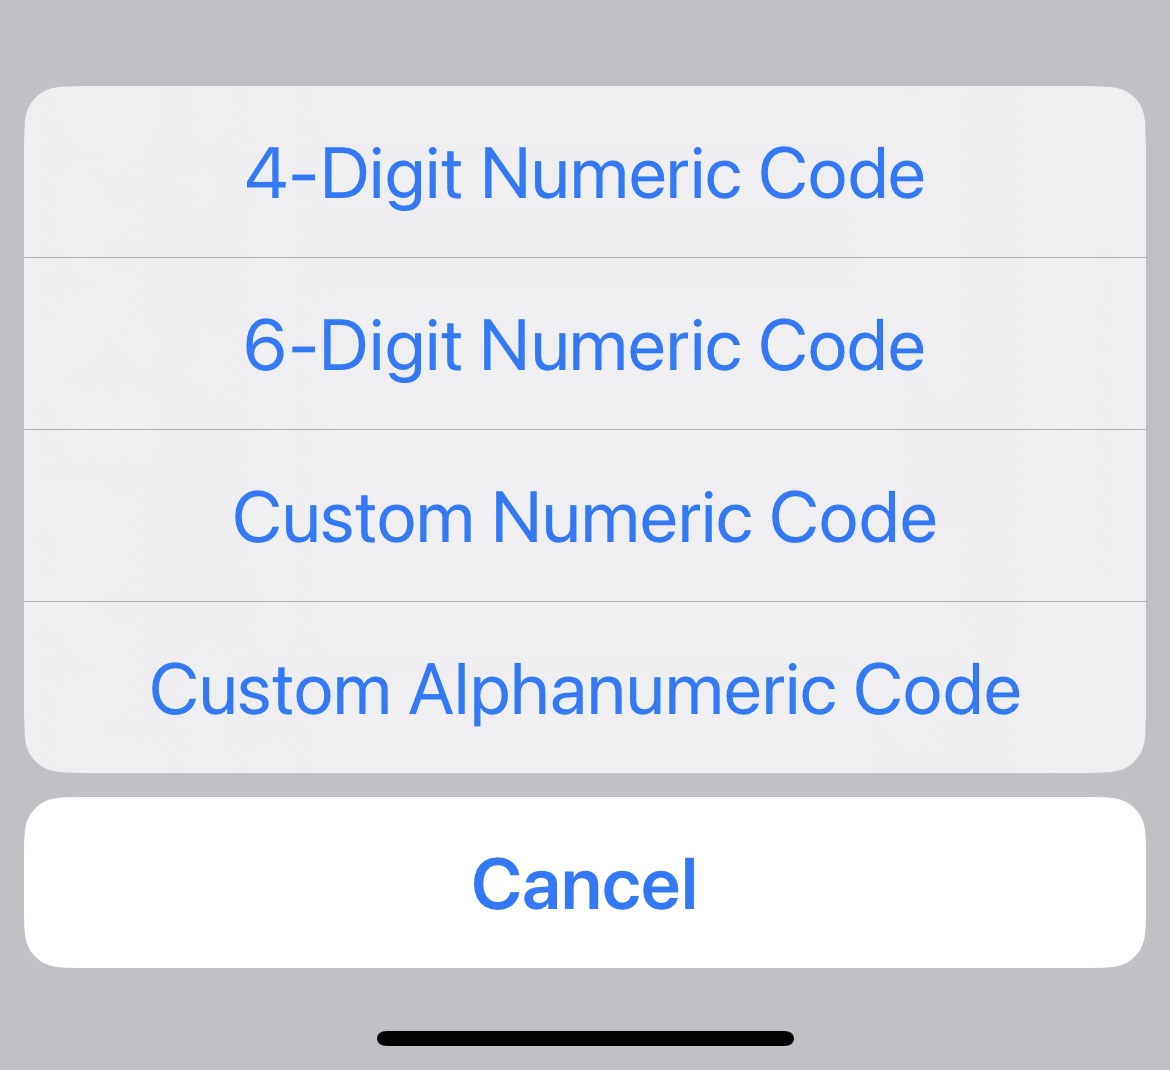
iOS will prompt you to create a six-digit passcode, but there is a more sophisticated way to make your iOS device more secure: using an alphanumeric passcode.
It’s fairly easy to change your passcode to an alphanumeric one:
- Open the Settings app.
- Tap Face ID and Passcode (or Touch ID and Passcode on the iPhone SE), then Change Passcode.
- Enter the passcode you created during setup.
- Tap on Passcode Options.
- Choose Custom Alphanumeric Code.
- Type your new password. Make sure it’s one you can remember.
You have 72 hours when you can continue to use your old password, just in case you forget the new one!
Adjust your display settings
Foundry
If you have an iPhone 14 Pro/Max or 15 Pro/Max you have an always-on display, so you will always be able to see the time and your widgets. To customize the always-on display go to Settings > Display & Brightness and tap Always On Display.
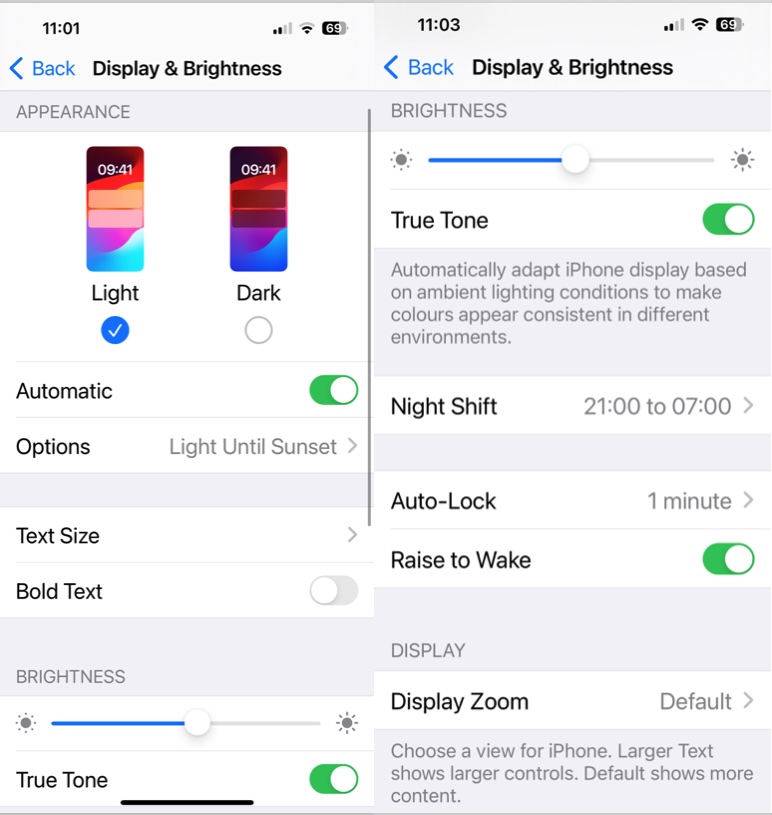
But even if your new iPhone doesn’t have an always-on display, there are still lots of display options. The coolest is system-wide Dark Mode, which gives all the pre-installed apps–and any third-party apps that have built-in compatibility–a black or dark grey background that’s more relaxing to read in the evening.
You can have Dark Mode on all the time, or you can choose for it to be on from “Light until Sunset” (which switches based on the time of day) or set your own custom schedule.
To turn on Dark Mode follow these steps:
- Open Settings.
- Tap Display & Brightness.
- At the top of the next screen, you’ll see Light and Dark options side by side. You can choose one, or you can switch on Automatic to set Dark Mode to come on automatically at certain times, such as from Sunset to Sunrise, or on a custom schedule.
Another tweak to make here is Night Shift, that can take some of the blue hues out of your screen late at night. You can adjust the timing of this if you are finding it comes on a little early in the evening. Set it to a couple of hours before you go to bed and, hopefully, you will sleep better.
You can adjust the timing and color settings for Night Shift in Display & Brightness > Night Shift.
For example, if you are finding Night Shift is a bit too orange for your liking you can adjust the slider a little toward the Less Warm side if you don’t want to skew the display quite so much.
If you are struggling to read the text on your screen you can also adjust text size system-wide. To make the text on your iPhone bigger go to Settings > Display & Brightness > Text Size.
Customize Focus modes
Foundry
The quickest way to activate Do Not Disturb is from the Control Center—swipe down from the top right corner of the screen and tap the crescent moon icon.
A matching moon icon will then appear in the top bar of your iPhone screen. With Do Not Disturb activated, incoming calls and alerts will be silenced. For a more advanced range of options, go to Settings > Focus > Do Not Disturb, which includes the ability to set a schedule so that Do Not Disturb turns on at certain times or in certain places.
You can also allow exceptions: people who will be allowed to contact you even with the Do Not Disturb mode activated. Go to Settings > Focus > Do Not Disturb and tap People. Here you can add anyone in your Contacts. You can also allow calls from certain people. There’s also a setting that means if someone calls a second time within three minutes it will get through, so you know that in an emergency people will get through.
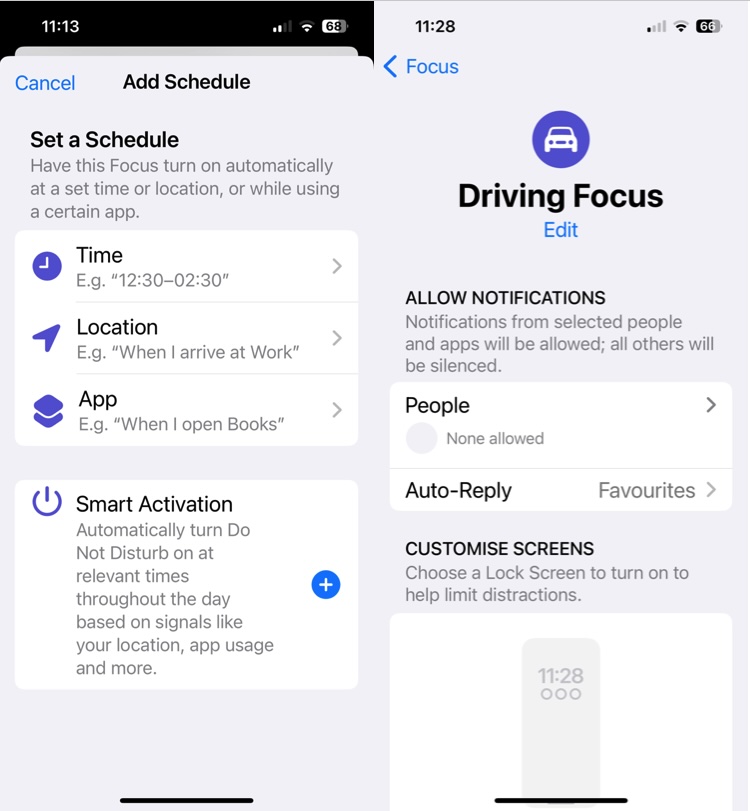
Another related feature is the Driving Focus (which used to be known as Do Not Disturb While Driving). This is designed to stop dangerous situations on the road by not displaying text messages and notifications when you are driving.
To set up Driving Focus:
- Go to Settings > Focus.
- Tap on the + in the top right corner.
- Choose Driving.
- Tap on Customize Focus.
Here you can choose to Allow notifications from certain people, set an auto-reply customize your lock screen to reduce distractions, and more.
You’ll see there are three settings: Automatically (which attempts to work out when you’re driving by your motion, and which we wouldn’t recommend, given how many times we’ve seen this activate on trains), When Connected to Car Bluetooth, and Manually.
Go back to the Do Not Disturb page of Settings and you’ll see the automated replies at the bottom of the screen. Select who you want to get this reply, and edit the reply by tapping Auto-Reply and then tapping the message.
Customize the Control Center
Foundry
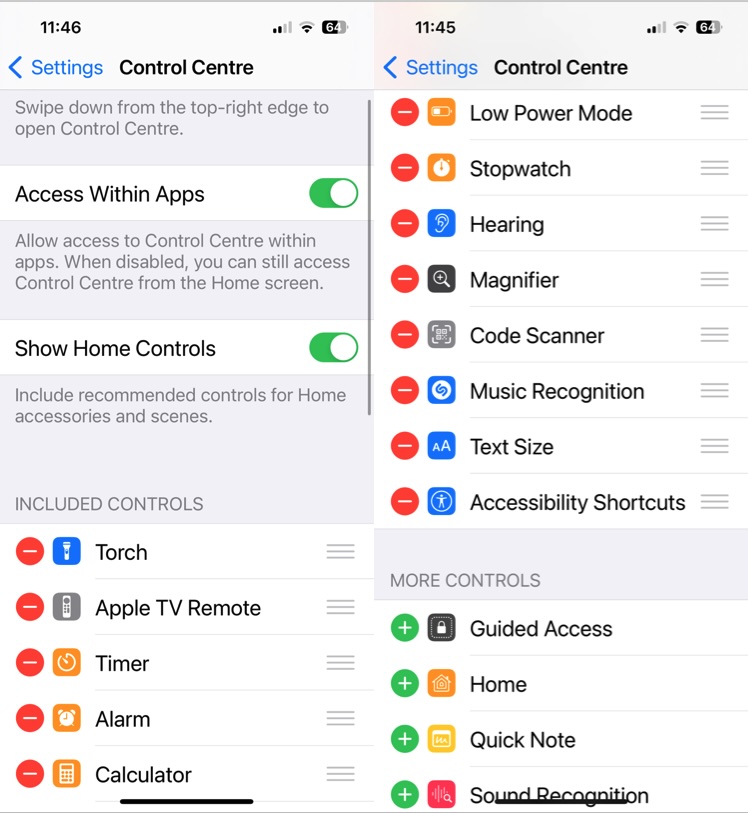
Get access to the most useful features on your iPhone quickly by adding them to the Control Centre.
You can add more than 20 different Control Center shortcuts to Apple apps and features including Shazam Music Recognition, a Screen Recording button, Quick Note, Magnifier, and all the usual shortcuts, like the Camera, TV Remote, Flashlight (Torch), Low Power Mode, and more.
To personalize your Control Center open Settings > Control Center and tap + on any controls you want to add or – on any you want. to remove.
Take a trip to the Dynamic Island
Chris Martin / Foundry
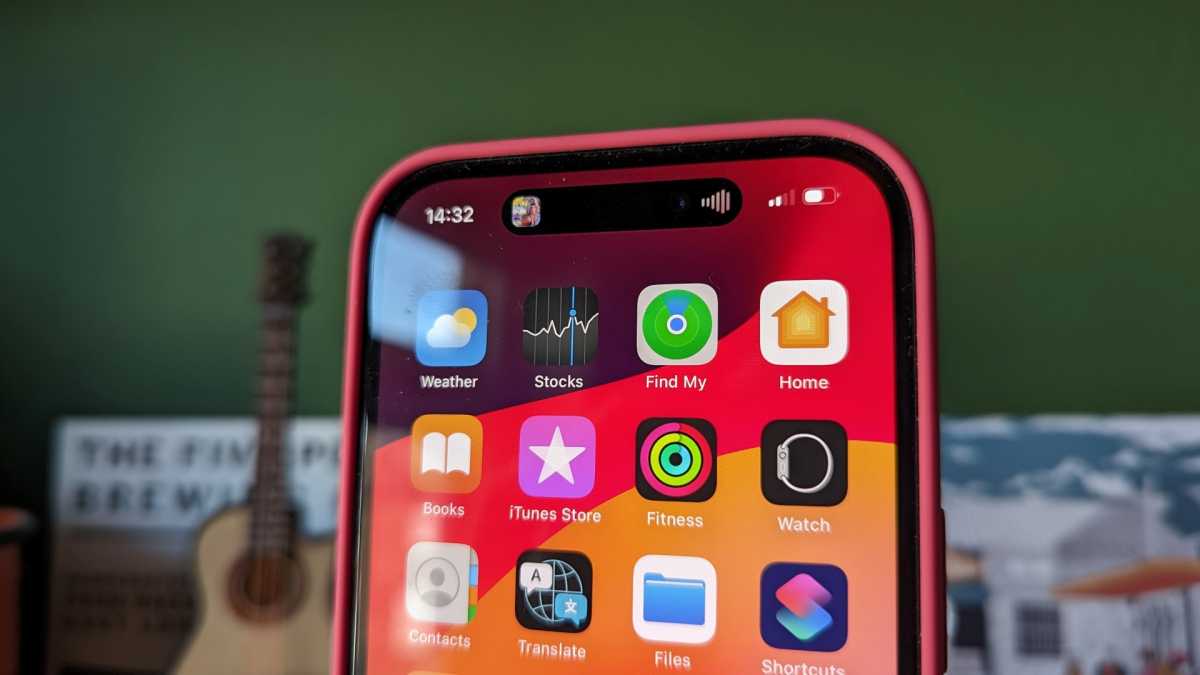
The Dynamic Island is the evolution of the Notch to an intelligent section at the top of your iPhone that can change and reshape to include useful information when you might want it. It is a feature of the iPhone 14 Pro and Pro Max and the entire iPhone 15 range.
If your iPhone has the Dynamic Island you will see information appear around the notch at the top of the screen such as Apple Pay confirmations, battery status, Maps directions, phone call details, sports scores, timers, music, and more–including third-party apps. Tap on the Dynamic Island to bring up related controls.
Change Siri’s voice
Foundry
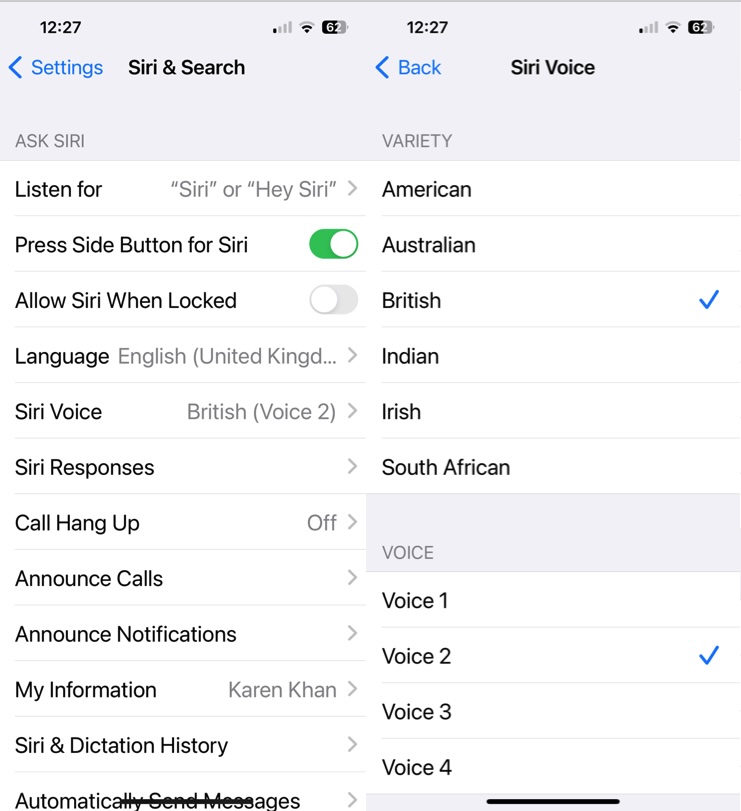
Siri’s voice is quite iconic, but did you know you can change it? There are multiple varieties (American, Australian, British, etc.) to choose from, each with several voices, including different genders.
To change Siri’s voice just open Settings > Siri & Search and tap Siri Voice to listen to the options.
You may have to download new voices, so this is usually best done when connected to Wi-Fi.
While you are messing around with Siri why not try out some of these funny things you can say to Siri.
Swipe to search everything
IDG
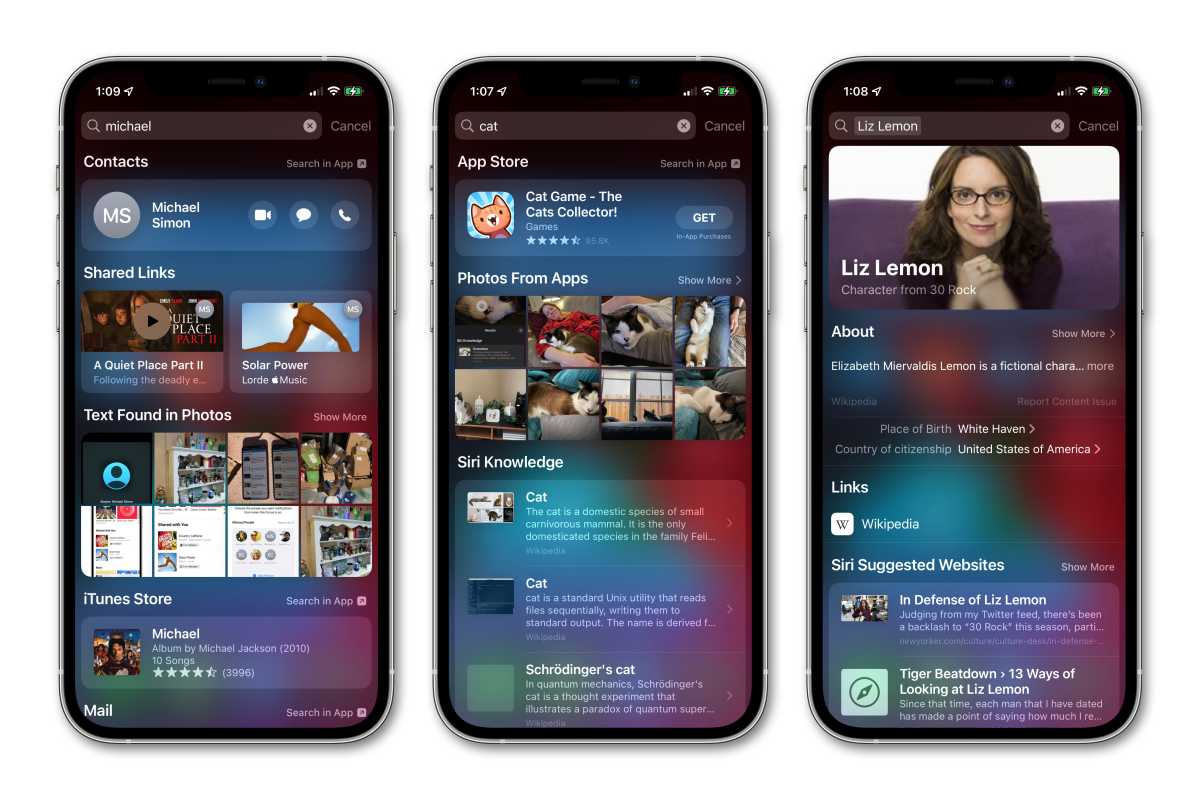
It’s always surprising to see how many people don’t seem to know about or use the iPhone’s powerful global search feature. Like Spotlight on the Mac, it can find apps, search the web, and search through all sorts of content on your device like photos, documents, emails, Messages, and more.
Just swipe down on your Home screen to access it–not down from the top edge (that will open the Notification Center or Control Center), just give the home screen a downward swipe from anywhere in the middle of the screen.
Spotlight Search on the iPhone is so overlooked that Apple actually added a little “Search” button to the bottom of the Home screen in iOS 16. Just search for anything and scroll down to find results in the App Store, on the web, and from within the various apps on your phone. You can type in simple math problems and stuff, too.
Pick your widgets
Foundry
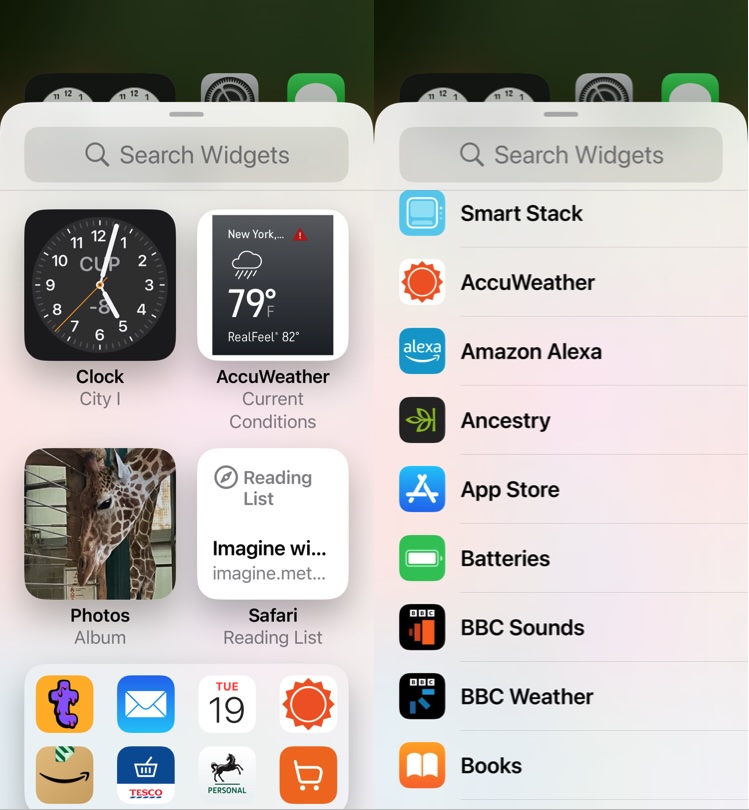
Widgets are a great way to get at-a-glance info on your Home screen. To add Widgets to your iPhone screen follow these steps:
- Enter ‘jiggle mode’ by pressing and holding the screen until the apps start to wiggle.
- Tap on the + in the top left.
- Select any Widgets that appear, or search for specific Widgets.
The Siri Suggestions widget is handy if you want the apps you are most likely to need at any given moment to appear on your Home screen.
Read our guide to How to add, remove, and customize widgets for more.
But don’t get carried away: too many widgets leave little room for apps. Fortunately, you can stack widgets of the same size!
- Scroll down through the Widget options until you find Smart Stack.
- Tap on Add Widget.
- Once you have a widget on your home screen, tap and hold on the widget until a menu pops up.
- You can select “Edit stack” to pick which other widgets you want on top of it.
- You can now swipe through a number of different widgets that appear in that space.
- Not happy with the Widgets in your Stack? Press and hold on the Smart Stack and choose Edit Stack. Now you can remove any you don’t want.
Your iPhone will do its best to show you the widget you’re most likely to want to see from a Stack, using time of day and location along with your past behavior. If you aren’t seeing the one you want, just swipe up or down on the widgets to cycle through the stack.
Add a button to the back of your iPhone
IDG
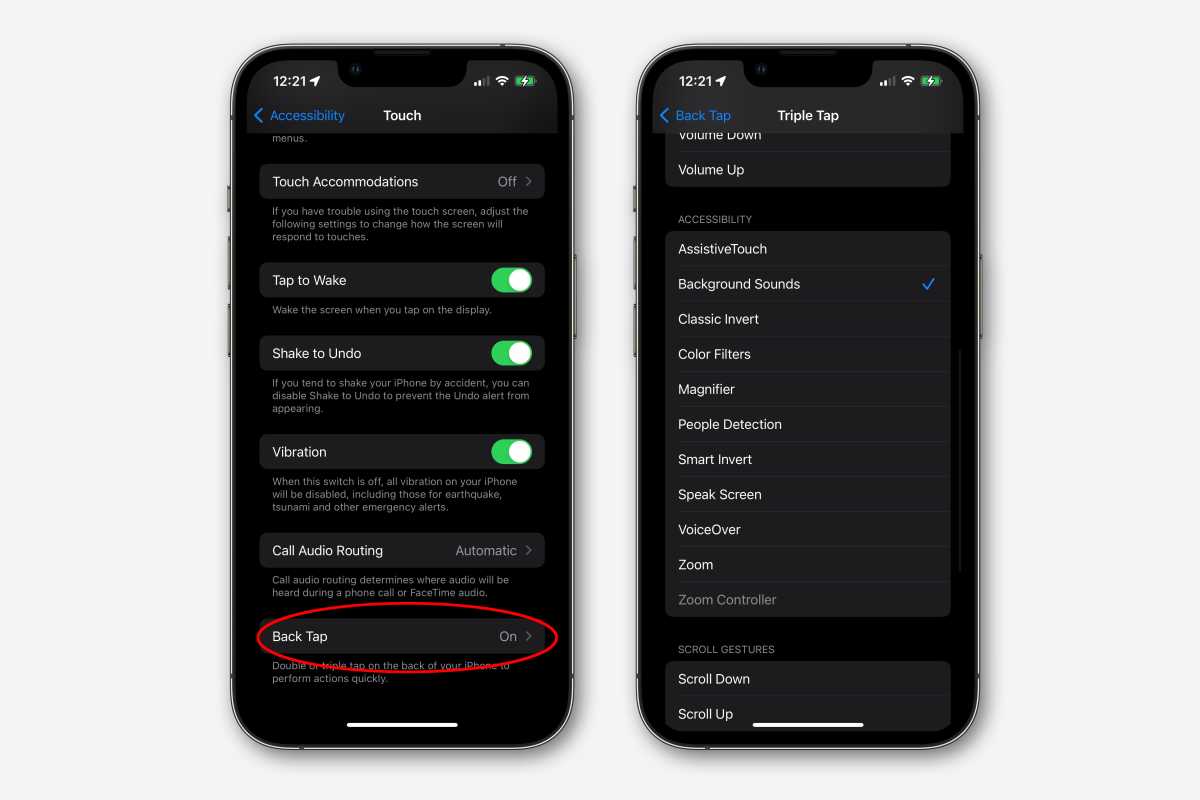
Your iPhone has an accessibility feature that’s really handy for just about everyone. It’s called “Back Tap” and it lets you double-tap or triple-tap the back of your iPhone to trigger an action. You can double-tap to launch the camera, for example, or triple-tap to toggle the flashlight, open the Notification Center, toggle mute, take a screenshot, or launch a custom Shortcut.
Here’s how to set up Back Tap:
- Open Settings.
- Tap on Accessibility.
- Scroll down to find Back Tap (it’s near the bottom) and select it.
- You can set independent actions for a double-tap and a triple-tap.
- Choose what you want to happen if you double-tap the back of the phone from the list (Camera, Control Centre, Siri, Flashlight, etc.). You can even choose from your Shortcuts which could include calling a specific contact.
In our experience, it works through cases, but if you have a thick wallet-style case it might not.
Use these keyboard tricks
Foundry
Use the keyboard like a trackpad: Anytime the keyboard is up, tap and hold on the spacebar. After a second you’ll see all the letters blank out and you can drag your finger around to move the cursor as if using a trackpad. Then you can move the cursor to the text you want, hold again and the text selector will pop up. It’s a really simple and handy way of moving back to just the right spot to make edits.
Turn on haptic feedback: Haptic feedback is available on the keyboard, but it’s not enabled by default. To turn it on (and turn the annoying clicks off), open Settings, select Sound and Haptics, then Keyboard Feedback. You can independently enable or disable sounds and haptics. It’s a fantastic feature that adds a small vibration under your fingers as you type. It just might help you make fewer mistakes!
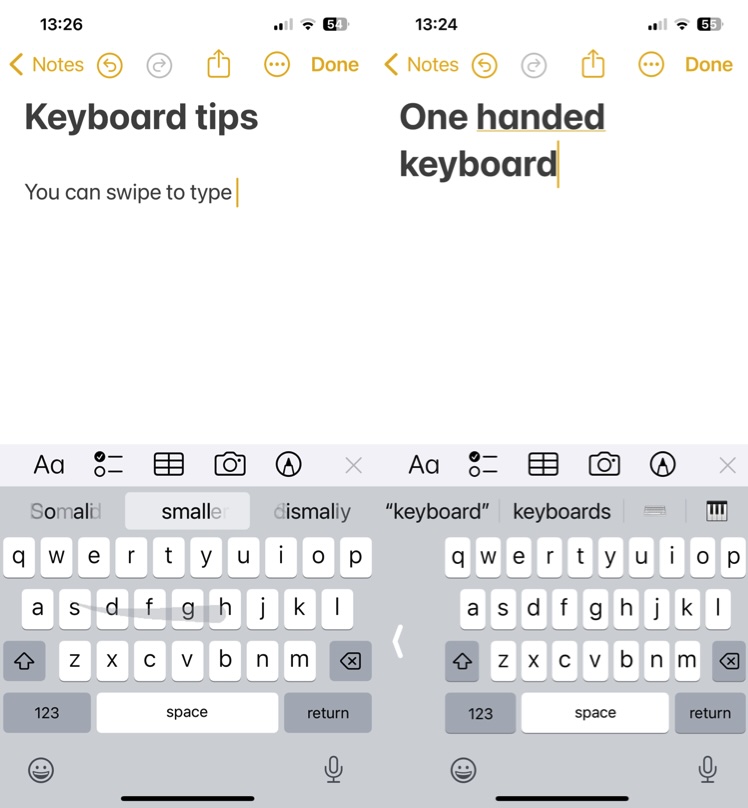
One-handed typing: You can shift the keyboard over to one side to make typing with one hand easier. With the keyboard displayed, press and hold on the Emoji icon (or globe if you don’t see that). Tap on Keyboard settings. Now tap on One-Handed Keyboard to turn that feature on.
Slide to type: To type even faster (and generally more accurately) try swiping. Just drag your finger around the keyboard and as if by magic your iPhone will type out the words you want. To turn on Slide to Type go to Settings > General > Keyboards and toggle Slide to Type.
Play with the camera

“The Cave” (hibiscus) by Marco Colletta (@marcolletta.1). Shot on iPhone 13 Pro.
Apple
From Action mode in the iPhone 14 and later, which applies really heavy video stabilization to your hand-held shots, to the new portrait features in the iPhone 15 phones, there are lots of new photography features that your old phone probably didn’t offer.
To use Action Mode open the camera app, switch to Video mode, and tap the little “action” button to enable it. Video should be stable even if you are running while recording with the phone.
Portrait Mode and Portrait Lighting make for really beautiful shots of people and, for, the iPhone 15-series, animals. You can adjust the depth of field for these portraits to create more or less background blur.
Cinematic Mode arrived with the iPhone 13 and lets you focus on the subject in a video in a similar way to how Portrait Mode works with photos. There’s even automatic focus tracking.
Macro Photography is only available for the Pro iPhones, but if you have a Pro or Pro Max iPhone you can take really detailed close-ups.
Photographic Styles arrived with the iPhone 13 and lets you customize the image processing pipeline to give your photos a slightly different tone. Open the Camera app, switch to Photo mode, and swipe upward to show the little camera control buttons. You can also select your Photographic Style in Settings > Camera > Photographic Styles.
Super zoom: If you have an iPhone 15 Pro Max, you have the only iPhone with a 5X zoom lens, which lets you get closer than ever to far-away subjects. To test it out, tap one of the zoom buttons in the viewfinder or pinch the screen to zoom.
For more read Which iPhone has the best camera?
Pull the subject of a photo out of the background

Foundry
Normally, cutting out an image from a photo requires Photoshop and a bit of skill, but with your iPhone, you can quickly select just the subject of an image and not the background.
Just tap and hold an image on any web page or in your Photos app. In Photos, the subject will be selected, while on a web image, you’ll get a context menu and have to tap on “Copy subject.”
You can then paste it into all sorts of other apps–Messages, Mail, even save it in Files. If you’ve got dextrous fingers, you can tap and hold the subject to drag it around into other apps. You can find a more detailed step-by-step walkthrough of how to cut out the subject from an image here.
A new option in iOS 17 is to Add a Sticker, which lets you add the cutout image as a Sticker that you can use in Messages and other apps.
Easily scan documents
Foundry
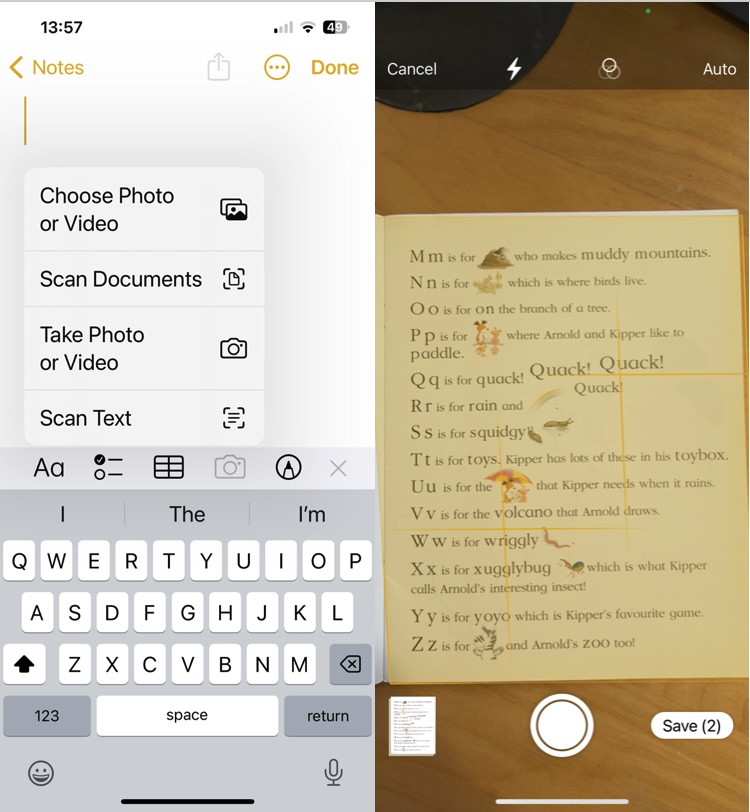
Your iPhone can, quite easily, scan paper documents into PDFs and even mark them up. You can save them to the cloud or your Files app, send in Messages or an email, whatever you want. There are a few ways to accomplish this, so consult our guide to scanning documents with an iPhone for more detail.
The easiest way is to use the Notes app.
- Open Notes.
- Tap the Camera button.
- Tap Scan Documents.
This is a great way to take receipts, vaccination records, registrations, and other important paper documents and produce a digital copy you can save in the cloud for safekeeping.
Set up your Medical ID
IDG
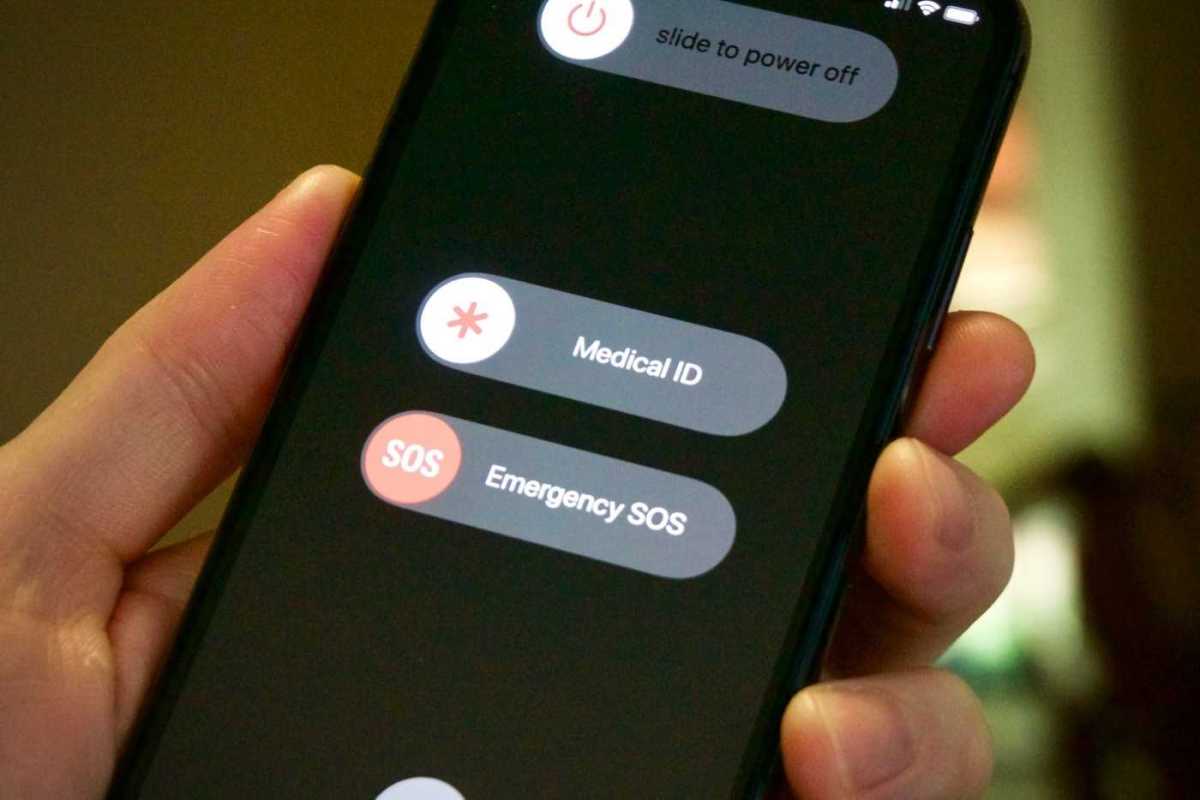
The tip that could save your life! Your iPhone can display emergency medical info to first responders. It’s called Medical ID, and it only takes a couple of minutes to set up. First, open the Health app. Then tap on your profile picture in the upper right. Tap Medical ID. Tap Edit in the upper right. You can fill in emergency contacts, medical allergies, important medical conditions, and other info.
Then tap the Show When Locked toggle, which will allow people to see your medical information in an emergency. You can also turn on Share During Emergency Call so that when you contact emergency services on your iPhone, your Medical ID will automatically be shared with the person on the line.
Just open the Health app to enter important Medical ID info and set up an emergency contact.
Medical ID info can display critical medical info or allergies on your lock screen to a first responder, and an emergency contact is someone who can be called in an emergency by pressing and holding the side and volume buttons.
- First, open the Health app.
- Then tap on your profile picture in the upper right.
- Tap Medical ID.
- Tap Edit in the upper right.
- Enter any critical medical info a first responder would need to know if you’re in an accident and an emergency contact you would want to reach.
We have more iPhone tips here:
