To many of us, backing up a Mac means setting up Time Machine to make incremental backups and signing up to various iCloud services so that we can keep copies of photos, music, files and more in the cloud.
But, while Time Machine and iCloud are great resources, they aren’t perfect, and relying on them alone to keep your data safe is a mistake that could have disastrous consequences.
An ideal strategy consists of at least two separate backup schedules, with at least one of those backing up to a drive that’s stored offsite. At the very least, if you use Time Machine to back up to an external hard drive or network device, you should also have another tool running regular backups to a different drive.
That means buying a backup application and using it, before you lose data. There are a number of different options when it comes to choosing backup software.
Regular backups
Many options are focused solely on making backing up your Mac regularly as easy as as possible. Apple’s own Time Machine, which is included with macOS, is an example of this kind of solution.
Clones
Some apps are focused on creating clones of your hard drive and offer incremental backup as an extra feature.
However, over the last few versions of macOS Apple has been making changes to make it more secure. One of the consequences of those changes is that is harder for third-party applications that need deep access to the system to work. One example of this is the introduction of the Signed System Volume in Big Sur. Copies of the Signed System Volume are not bootable without a cryptographic seal applied by Apple. That means that the old way of creating bootable clones no longer works and developers have had to find ways to work with and around Apple’s new way of doing things.
The net result is that, depending on which version of macOS you’re running and whether you have an Intel or Apple silicon Mac, bootable clones don’t always work. As one developer told us, “it’s a bit hit and miss”. There is no single solution to the problem, currently. Our reviews of tools here that create bootable clones should be read in that context.
Synchronize
A third category, represented in our round-up by ChronoSync, allows you to synchronise folders on your Mac with another drive or computer on a regular basis. Some FTP management applications also allow you to synchronise folders with FTP or WebDAV servers.
Backup offsite
Finally, there are online services that will store your data on their servers, providing a secure offsite backup. When you initially sign up for an online service, the first backup will take a while, possibly several days.
But once you’ve completed that, each subsequent run only copies files that have changes and so will take much less time and bandwidth. Most of these services also allow you to control how much bandwidth they use so you should never find that they get in the way of you working.
Best way to back up a Mac
Of the apps and services we look at here, Get Backup Pro is a simple and inexpensive backup tool, while ChronoSync, Carbon Copy Cloner and SuperDuper allow you to run incremental backups, through they’re each focused on other tasks. The three online backup tools, Backblaze, Carbonite and IDrive all have merits and of those three, Backblaze edges it.
However, overall, for a combination of ease of use, features and the ability to combine local backups with backup to the cloud, the outstanding choice is Acronis Cyber Protect Home Office.
Best backup software for Mac
Acronis Cyber Protect Home Office

Acronis is a name well known in the Windows world, but less so to Mac users.
Cyber Protect Home Office is the new name for Acronis True Image and is its personal backup solution. It supports backing up your data to a local disk, Acronis’ own cloud-based service, or a network-attached storage device. The latter makes it good option for anyone with a NAS that doesn’t support Apple’s Time Machine.
You’ll need to set up an account with Acronis to use its, but you can give Cyber Protect Home Office a spin without signing up for its paid-for service or even providing payment details, by using the free trial to back up to a local drive or network disk.
The main reason for the name change from True Image, which was chosen to show that the backup tool creates a ‘true image’ of the disk it’s backing up, is that it now goes beyond just backing up your disk. If backing up files is one part of the data protection equation, then the other is protecting those files, wherever they reside, from cyber-attack, and that’s what Cyber Protect Home Office is designed to do. It will scan existing data for malware, monitor files you interact with online, detect ransomware and cryptojacking attacks, and perform assessments of the vulnerability of your data to being compromised.
In addition to the security features, Cyber Protect Home Office now allows you to backup Office 365 files to Acronis Cloud, clone your startup disk (either a bootable clone or a compressed image), and synchronise files locally or with cloud storage. It also allows you to create what it calls a Survival Kit – a bootable disk with all your system, or a partition, and file backup.
Cyber Protect Home Office is very straightforward to use. Its interface is about as straightforward and friendly as they come. The first time you open it, your Mac is selected as the source. Click the Destination button to choose whether to back up to Acronis Cloud, a local drive or a NAS box.
If you don’t want to create an image of your entire Mac, click on the source box to choose files and folders to back up. From here, you can also back up external disks, a mobile device to your Mac, or your social media accounts to Acronis Cloud.
Click on the settings icon and you can schedule regular backups, exclude files, encrypt backups or delete old backups.
Pricing starts at £34.99/$49.99 per year per computer, but that doesn’t include cloud storage. If you want to use Acronis Cloud, you’ll pay a yearly subscription ranging from £62.99/$89.99 for one computer and 500 GB of cloud storage to £149.99/$209.99 for five computers and 1TB storage. Additional storage costs around £30/$30/year/TB.
Acronis Cyber Protect Home Office combines the best of local and online backup tools and offers lots of other features, such as protection from malware and other online threats. It’s not cheap, and the removal of the one-off payment option makes it more expensive to get started. However, it’s comprehensive, easy to use and well-worth considering.
Get Backup Pro (v3.6)
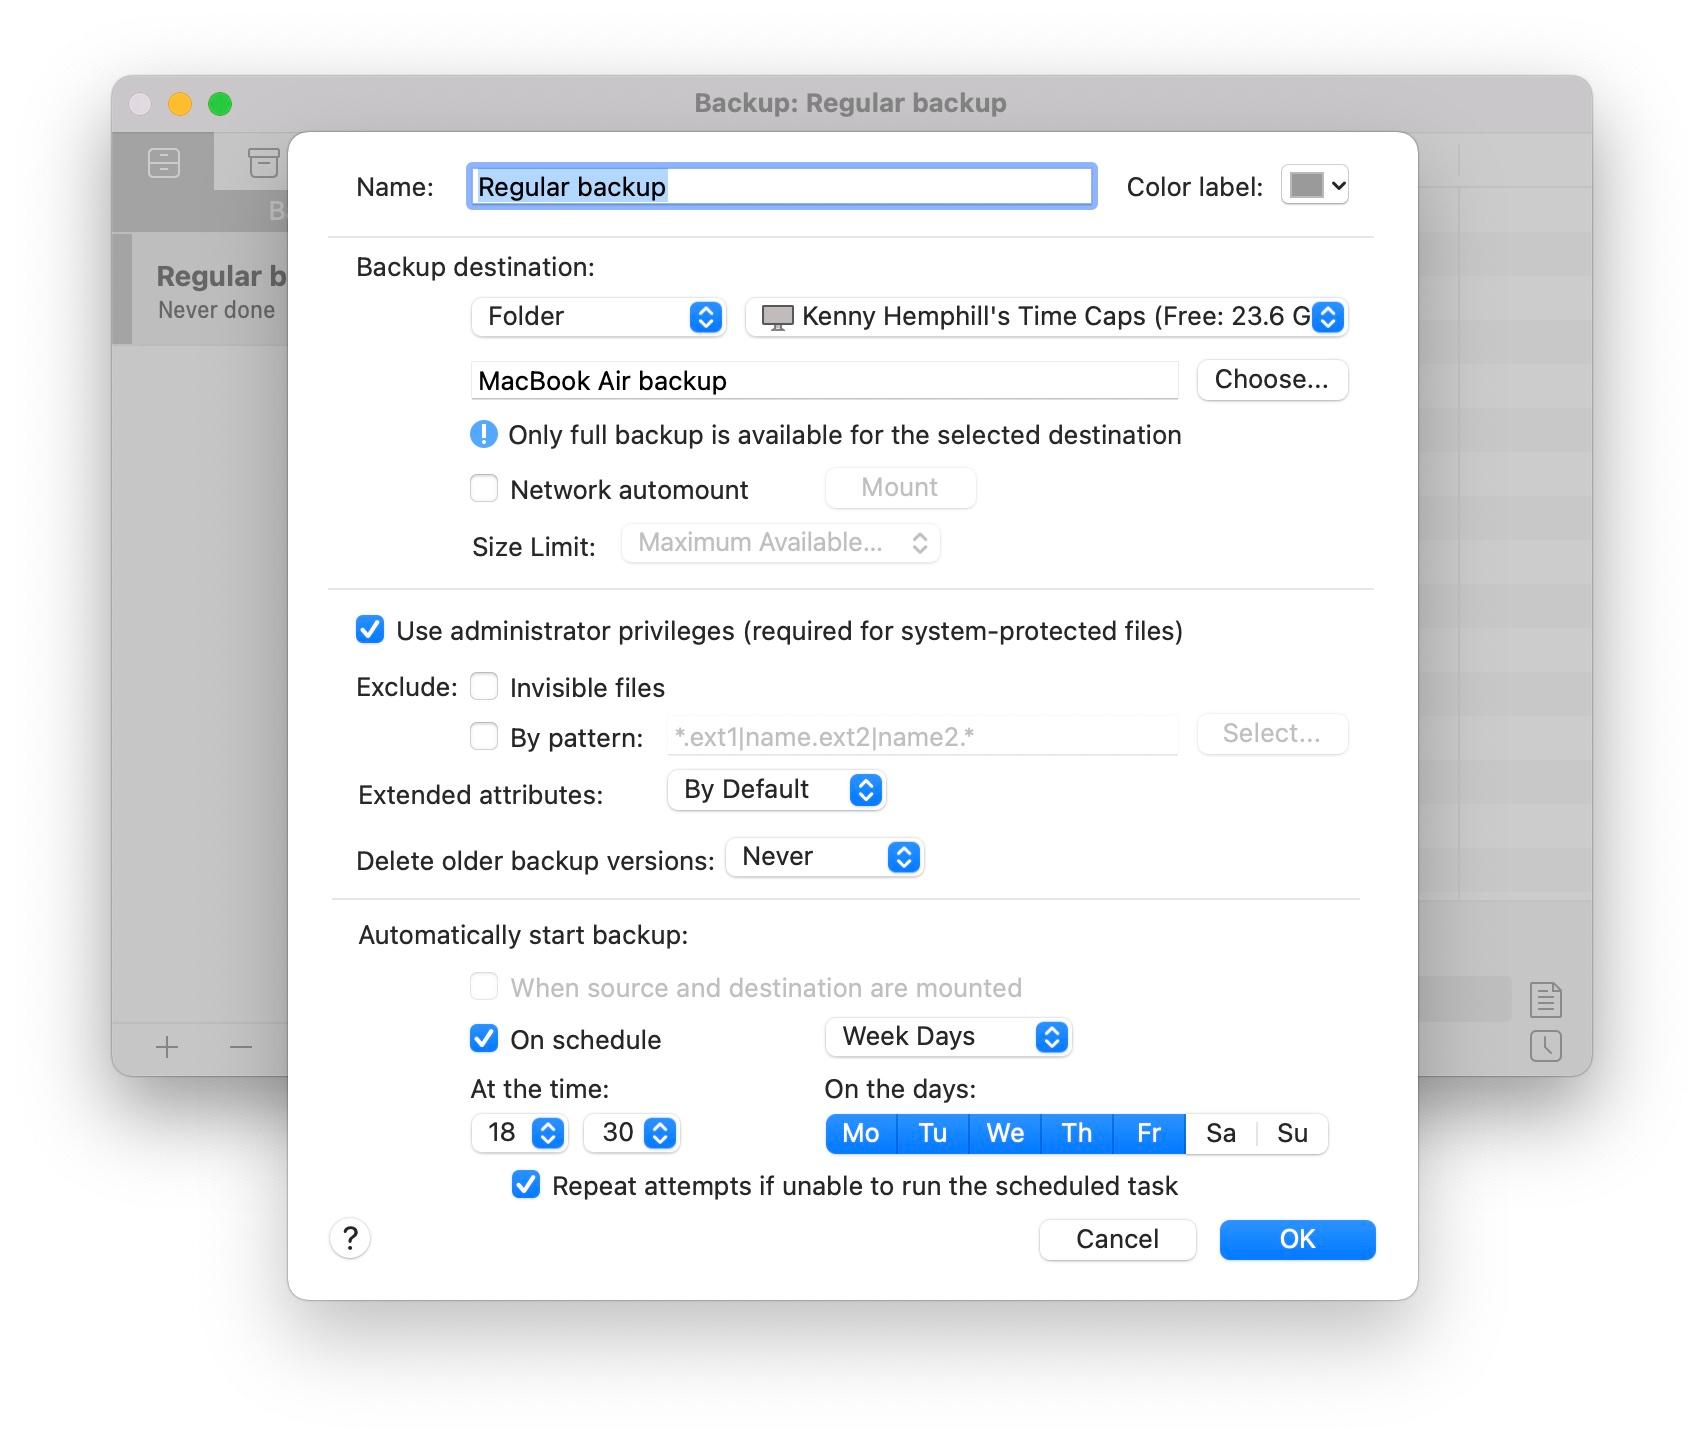
Get Backup Pro’s main attraction is its flexibility.
It can back up your entire hard drive or only the folders you specify. You use it to create bootable clones of your Mac’s startup drive, and to synchronise files and folders on different drives. Backups can be compressed to save space and you can choose whether to back up to a disk image or on a per file basis.
Scheduled backups take place in the background and Get Backup Pro shuts itself down once it’s finished. And if the worst happens and you can’t restart your Mac after a crash, you can restore to any Mac, even if it doesn’t have Get Backup Pro installed.
Get Backup Pro doesn’t have its own cloud service, so if you want to backup online as well as locally, you’ll need to do that with a third-party tool. It will, however, back up to network volumes. You can choose to automatically mount network volumes when a backup schedule starts, but you can’t specify files and folders to back up to a network disk: you must back up everything.
Perhaps Get Backup Pro’s greatest strength is its simplicity. Press the + in the sidebar to create a new project, then as soon as you’ve named it the settings window opens. Once you chosen options from there and confirmed them, all that’s left to do is add files.
You can do that by dragging folders into the application’s main window, by pressing a button labelled files+, or by choosing a template. It’s all very intuitive. If you need to start a backup manually, there’s a big playhead button at the bottom of the main window; click it and the selected backup will start.
There’s a free trial. A single license is $19.99 (approx £15) or you can get a family pack for up to 5 Macs for $35.99 (approx £28).
ChronoSync
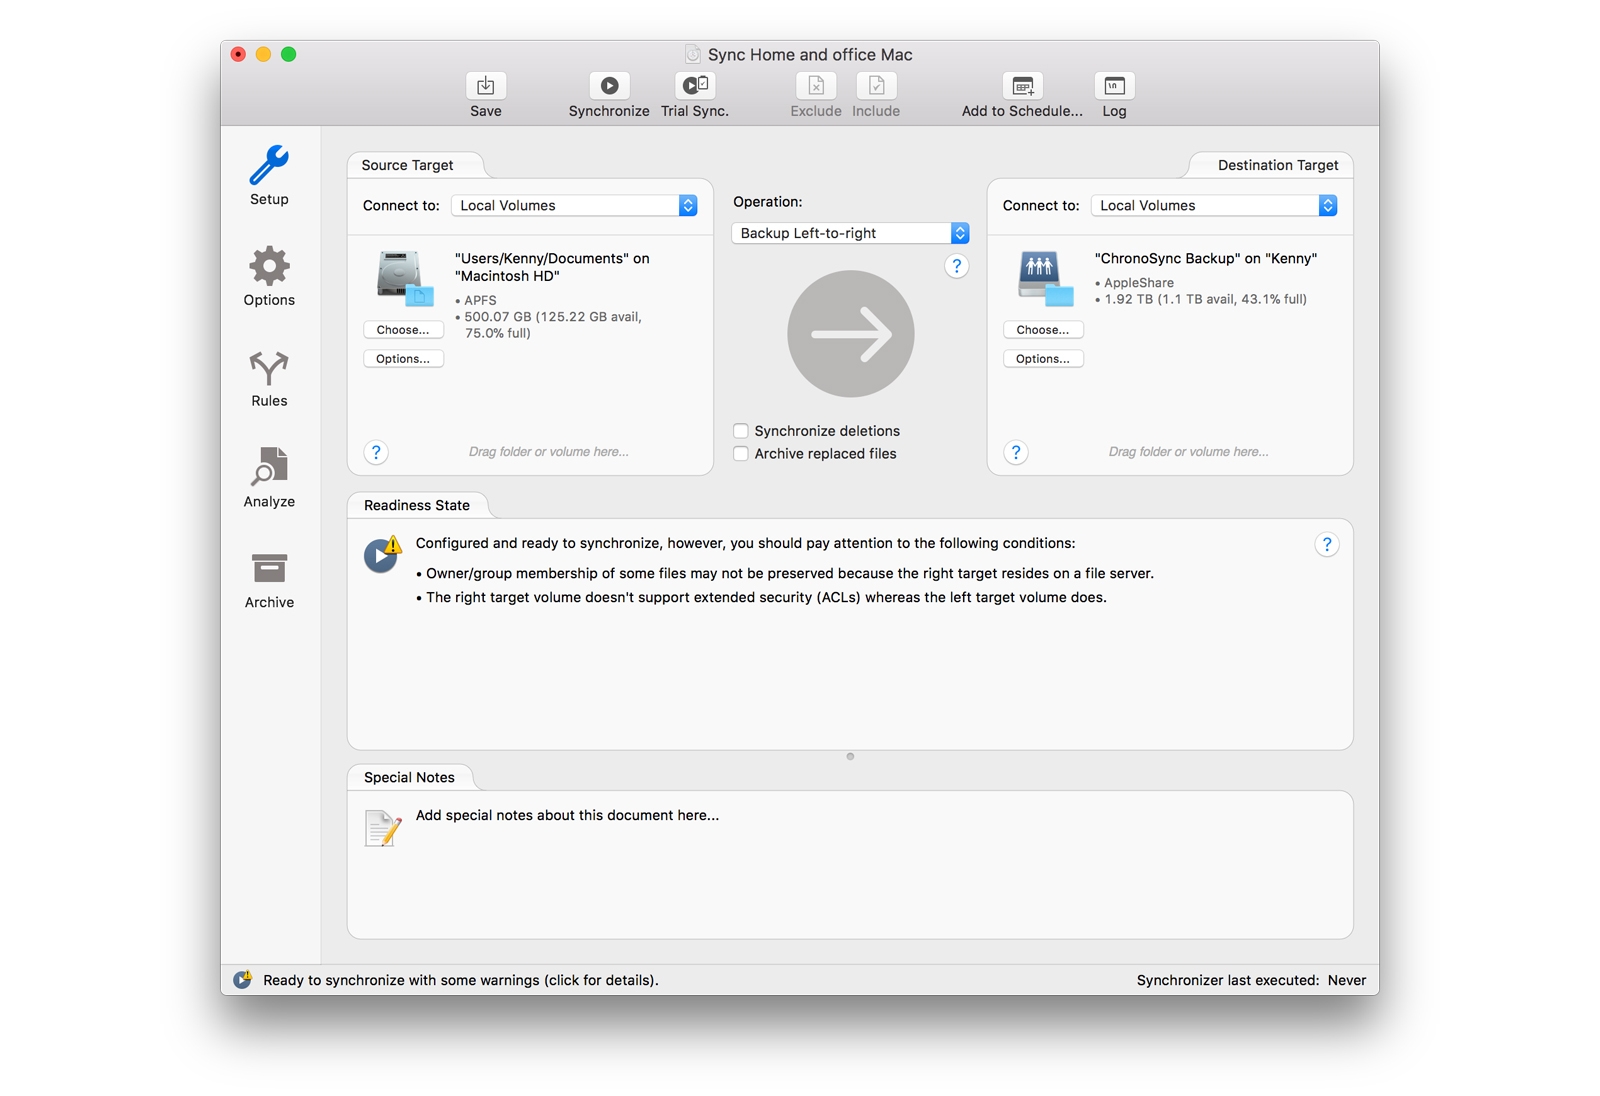
Don’t be fooled by its name. While ChronoSync has its roots in file synchronisation and still focuses on that, it’s a robust, feature-filled and highly configurable backup tool too.
As you’d expect, you can manually run backups or schedule them and you can back up to a local hard drive or NAS box. ChronoSync also supports backing up to Google Cloud and Amazon S3 storage.
You can use it to back up one remote location to another using SFTP and even set the location to be an iPhone or iPad using the optional InterConneX app. If you want to back up files and folders to another Mac, you can do that too.
Backups are incremental, but ChronoSync doesn’t just check the contents of a file for changes. If metadata has altered since the last backup, that will be reflected too. And backed-up files are copied to a temporary file and checked for integrity before the file on the destination volume is replaced with the new version.
ChronoSync can create two types of bootable clone: standard and mirrored. The former creates a bootable system on the destination volume, leaving other files on the volume intact. Mirror replaces the entire contents of the destination volume with files from the source.
ChronoSync’s interface is chock-full of options and that in itself may be enough to put you off if all you want it is a simple backup tool: Get Backup Pro or Acronis True Image are more straightforward options. However, if you need both synchronisation across multiple Macs and backup, it’s worth persevering.
ChronoSync costs $49.99 (approx £38). There is a 15 day fully functional trial or you could buy ChronoSync Express $24.99 (approx £19), a cut price version of the complete ChronoSync software, which allows you to sync and backup files locally, but doesn’t support cloud backup or cloning your Mac’s boot drive. You can download ChronoSync Express from the App Store here.
Backblaze
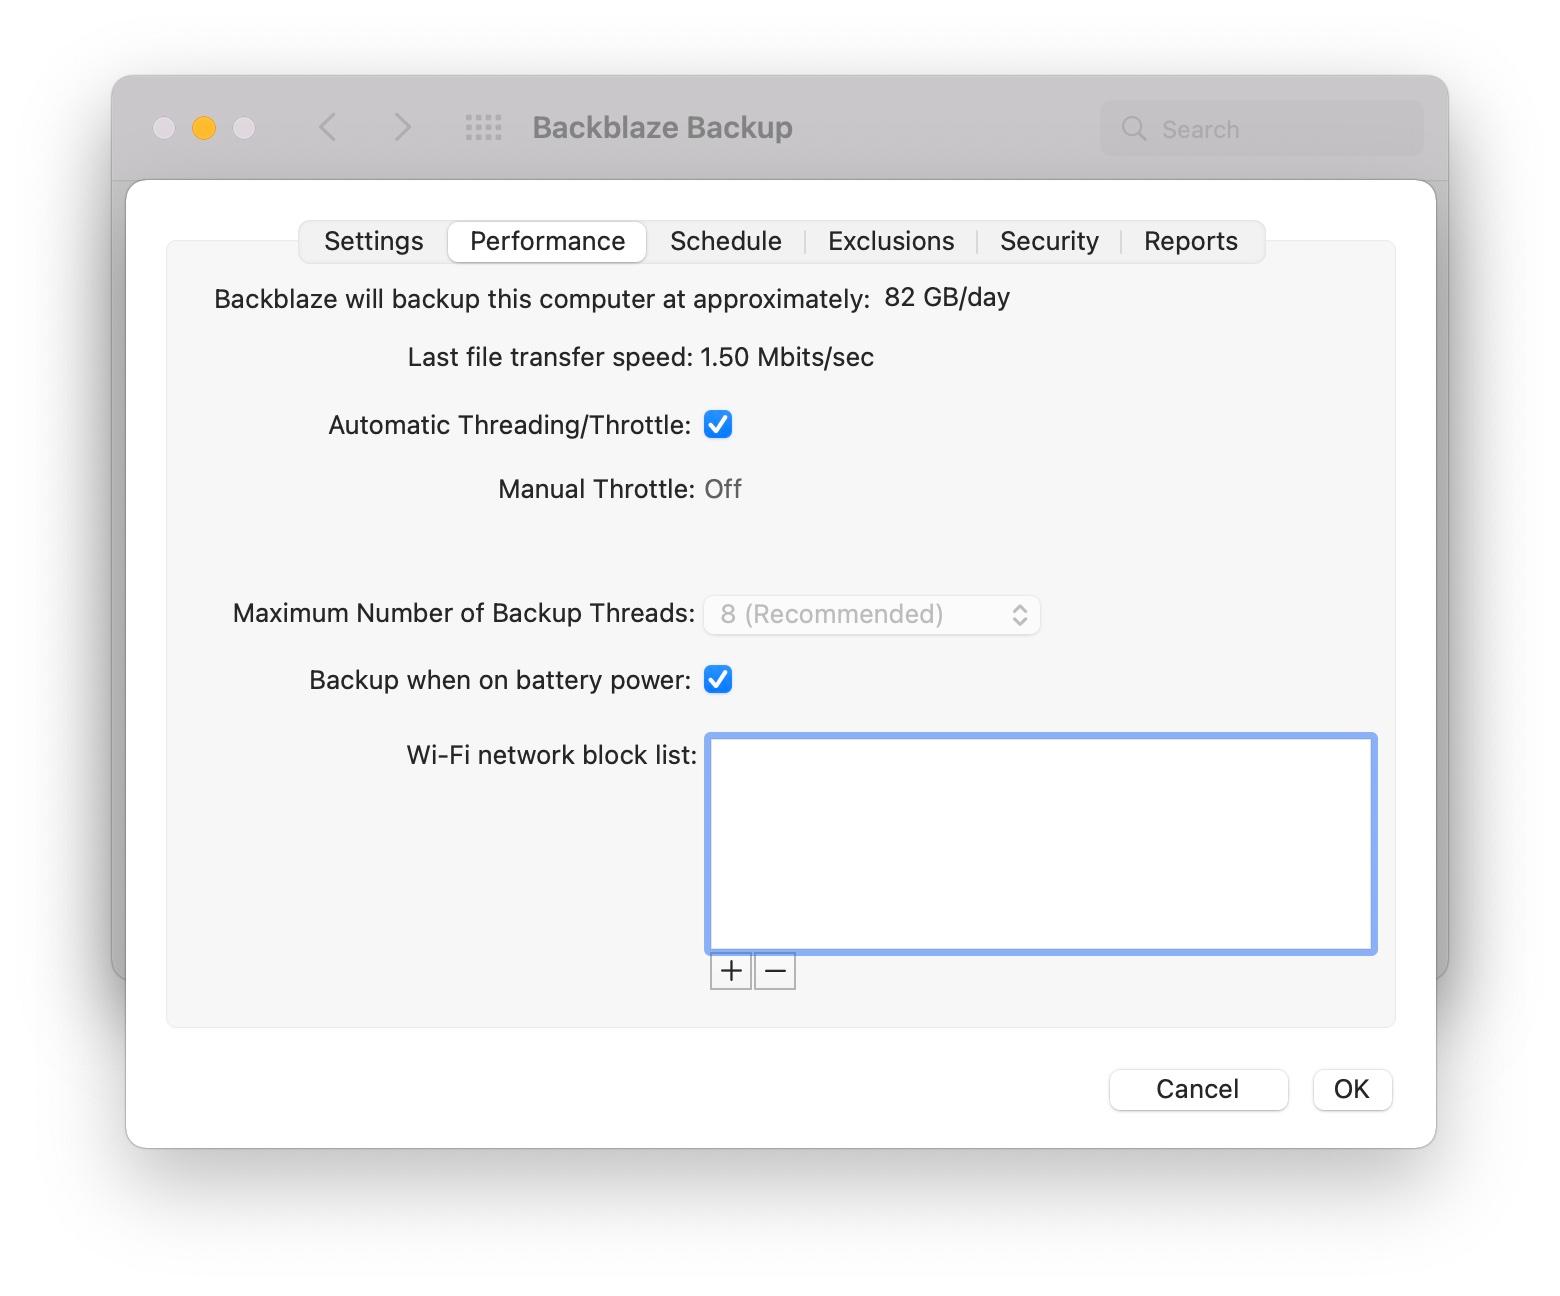
Backblaze is an online service that allows you to back up your Mac to its servers automatically or according to a schedule you set.
Once you create an account and select your plan (there’s a 30-day free trial, too), you download the Mac app and get started. Backblaze is focused on simplicity, so it automatically chooses what to back up. That includes the contents of your Documents, Pictures, Movies and Music folders, but excludes your Applications folder. Backblaze also excludes some file types from being backed up, including .dmg disk images – that restriction can be switched off, however.
Backups are kept for 30 days, so you can restore from any that ran during that time. And, as you would expect, backups are incremental so only files that have changed since it last ran are copied. Data is encrypted and you can optionally add a six-digit passcode to provide an additional layer of security.
When it comes to restoring your data, you have three options: you can restore via Backblaze’s web interface or you can have files sent to you on a USB stick or hard drive for an additional fee. And there’s a 100% refund if you return the USB stick or hard drive within 30 days, though you’ll have to pay shipping and taxes.
You can view individual files and choose which ones to download. And you can view and share backed up files on an iPhone or iPad with the Backblaze mobile app.
The Locate your Computer service tracks your Mac’s location to help you find it if it’s stolen and, if it’s still running backups, tell you its current IP address and show you recently backed-up data.
Backblaze’s user interface comprises a menu bar item and a System Preferences pane. However, that pane is more like a fully fledged application, with options to exclude files, add folders and disks to the backup, and throttle bandwidth. It’s simple and very Mac-like.
If you only need to back up one Mac, and particularly if you want to back up external disks, Backblaze’s simplicity and price give it the edge over Carbonite and IDrive.
With Backblaze you can back up your Mac for $7 (approx £5) a month or $70/year (approx £53), data is stored in secure data centres and two-factor authentication adds an extra level of security.
IDrive
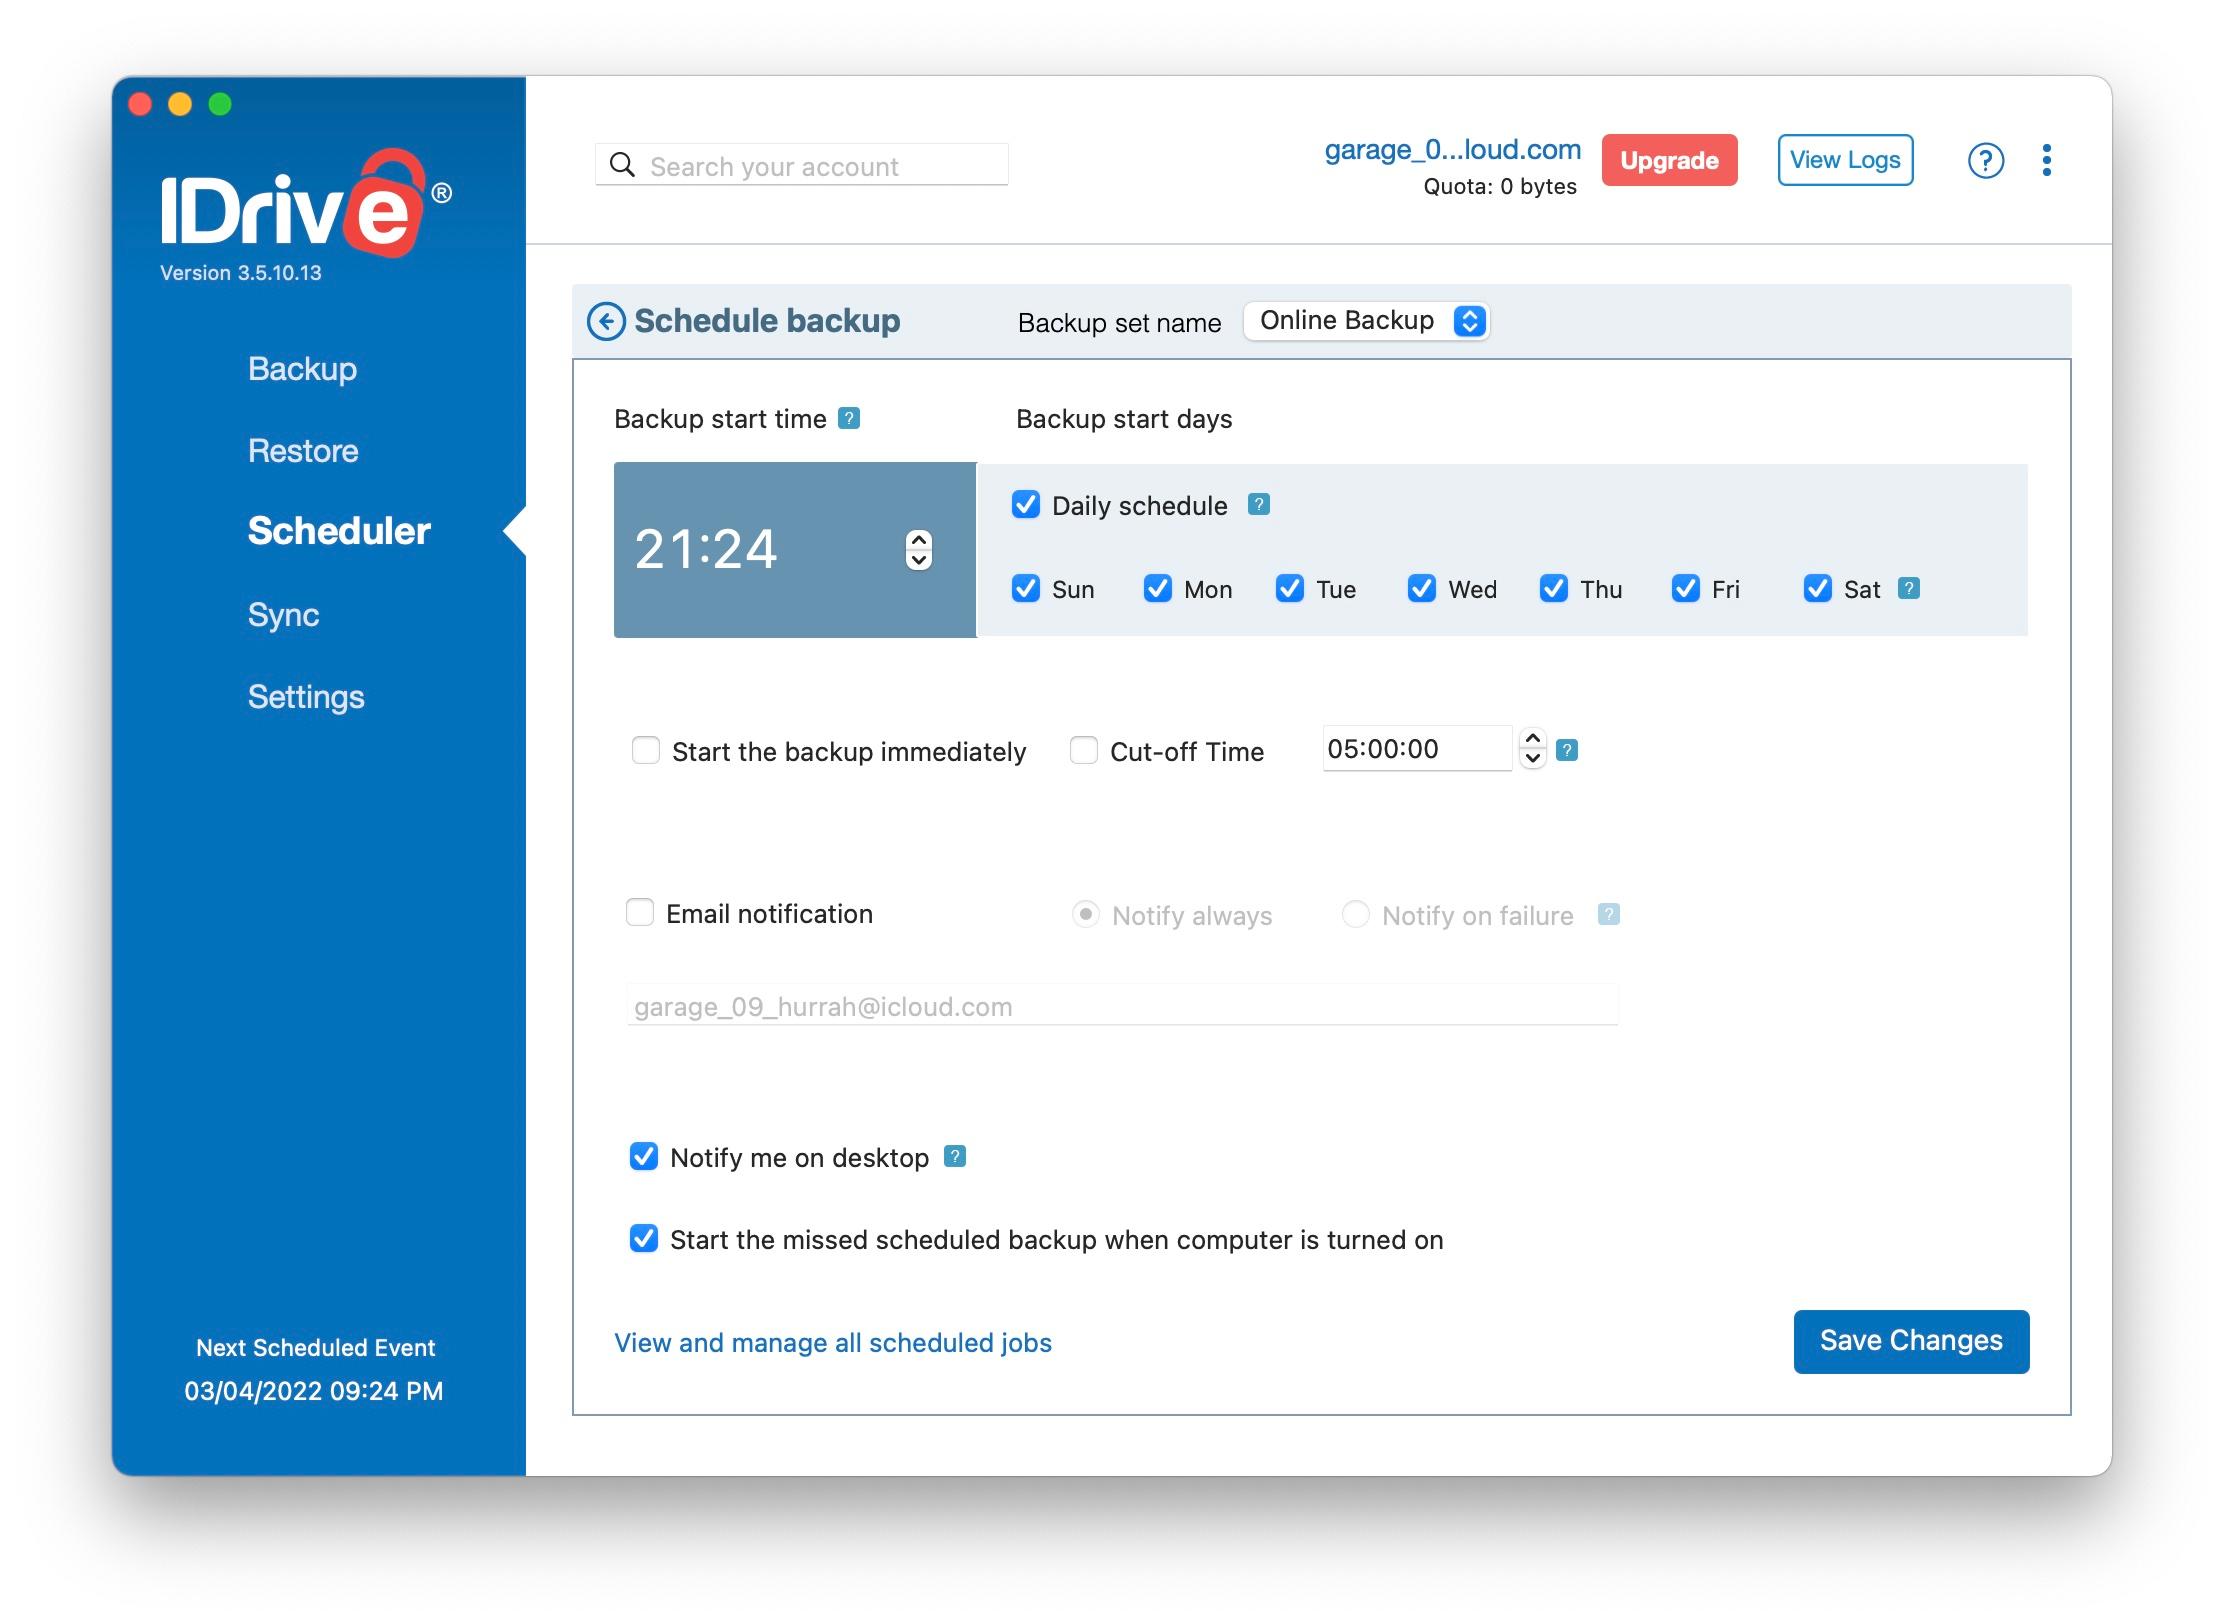
lDrive is another online backup service. However, it differs from both Backblaze and Carbonite in a number of ways.
Firstly, it has a free tier – you can back up 5GB without paying anything. After that, though, it’s more expensive than either of its competitors featured here.
Currently, the annual charge for the Personal tier is $59.62 (approx £46) for the first year and $79.50/year (approx £61) after that, but that only allows you to backup 5TB of data, while Backblaze and Carbonite allow unlimited data. However, that 5TB can be spread across multiple computers, whereas Backblaze and Carbonite limit you to one computer.
Also, if you prefer to restore by having data physically shipped to you, lDrive provides that for free for the first restore each year – though if you’re outside the US you’ll have to pay for the shipping.
Like Backblaze, lDrive also allows you to back up external hard drives. Even with external drives backing up, it’s unlikely most people will breach the 5TB limit – bearing in mind that you’re not backing up applications or system files.
Features like Rewind and Snapshots allow you to restore from earlier versions of files or snapshots of the complete data set. And all data is encrypted, with the option to set your own private encryption key.
lDrive’s user interface makes using it very straightforward. Your Desktop, Documents, Music and Pictures folders are automatically selected for backup, along with the contents of ~/Library/Mail.
To add other folders, click ‘Change’ at the bottom of the window – that’s not exactly intuitive. You can add videos to the backup, but locating them in lDrive’s interface takes a great deal of doing.
Both scheduling and restoring are straightforward, however. As is choosing a local drive as the destination for a backup in place of lDrive’s servers.
lDrive’s free tier and the ability to spread your data allocation in the paid tiers across multiple computers makes it attractive. Overall, though, it’s expensive for a single machine.
Carbon Copy Cloner 6
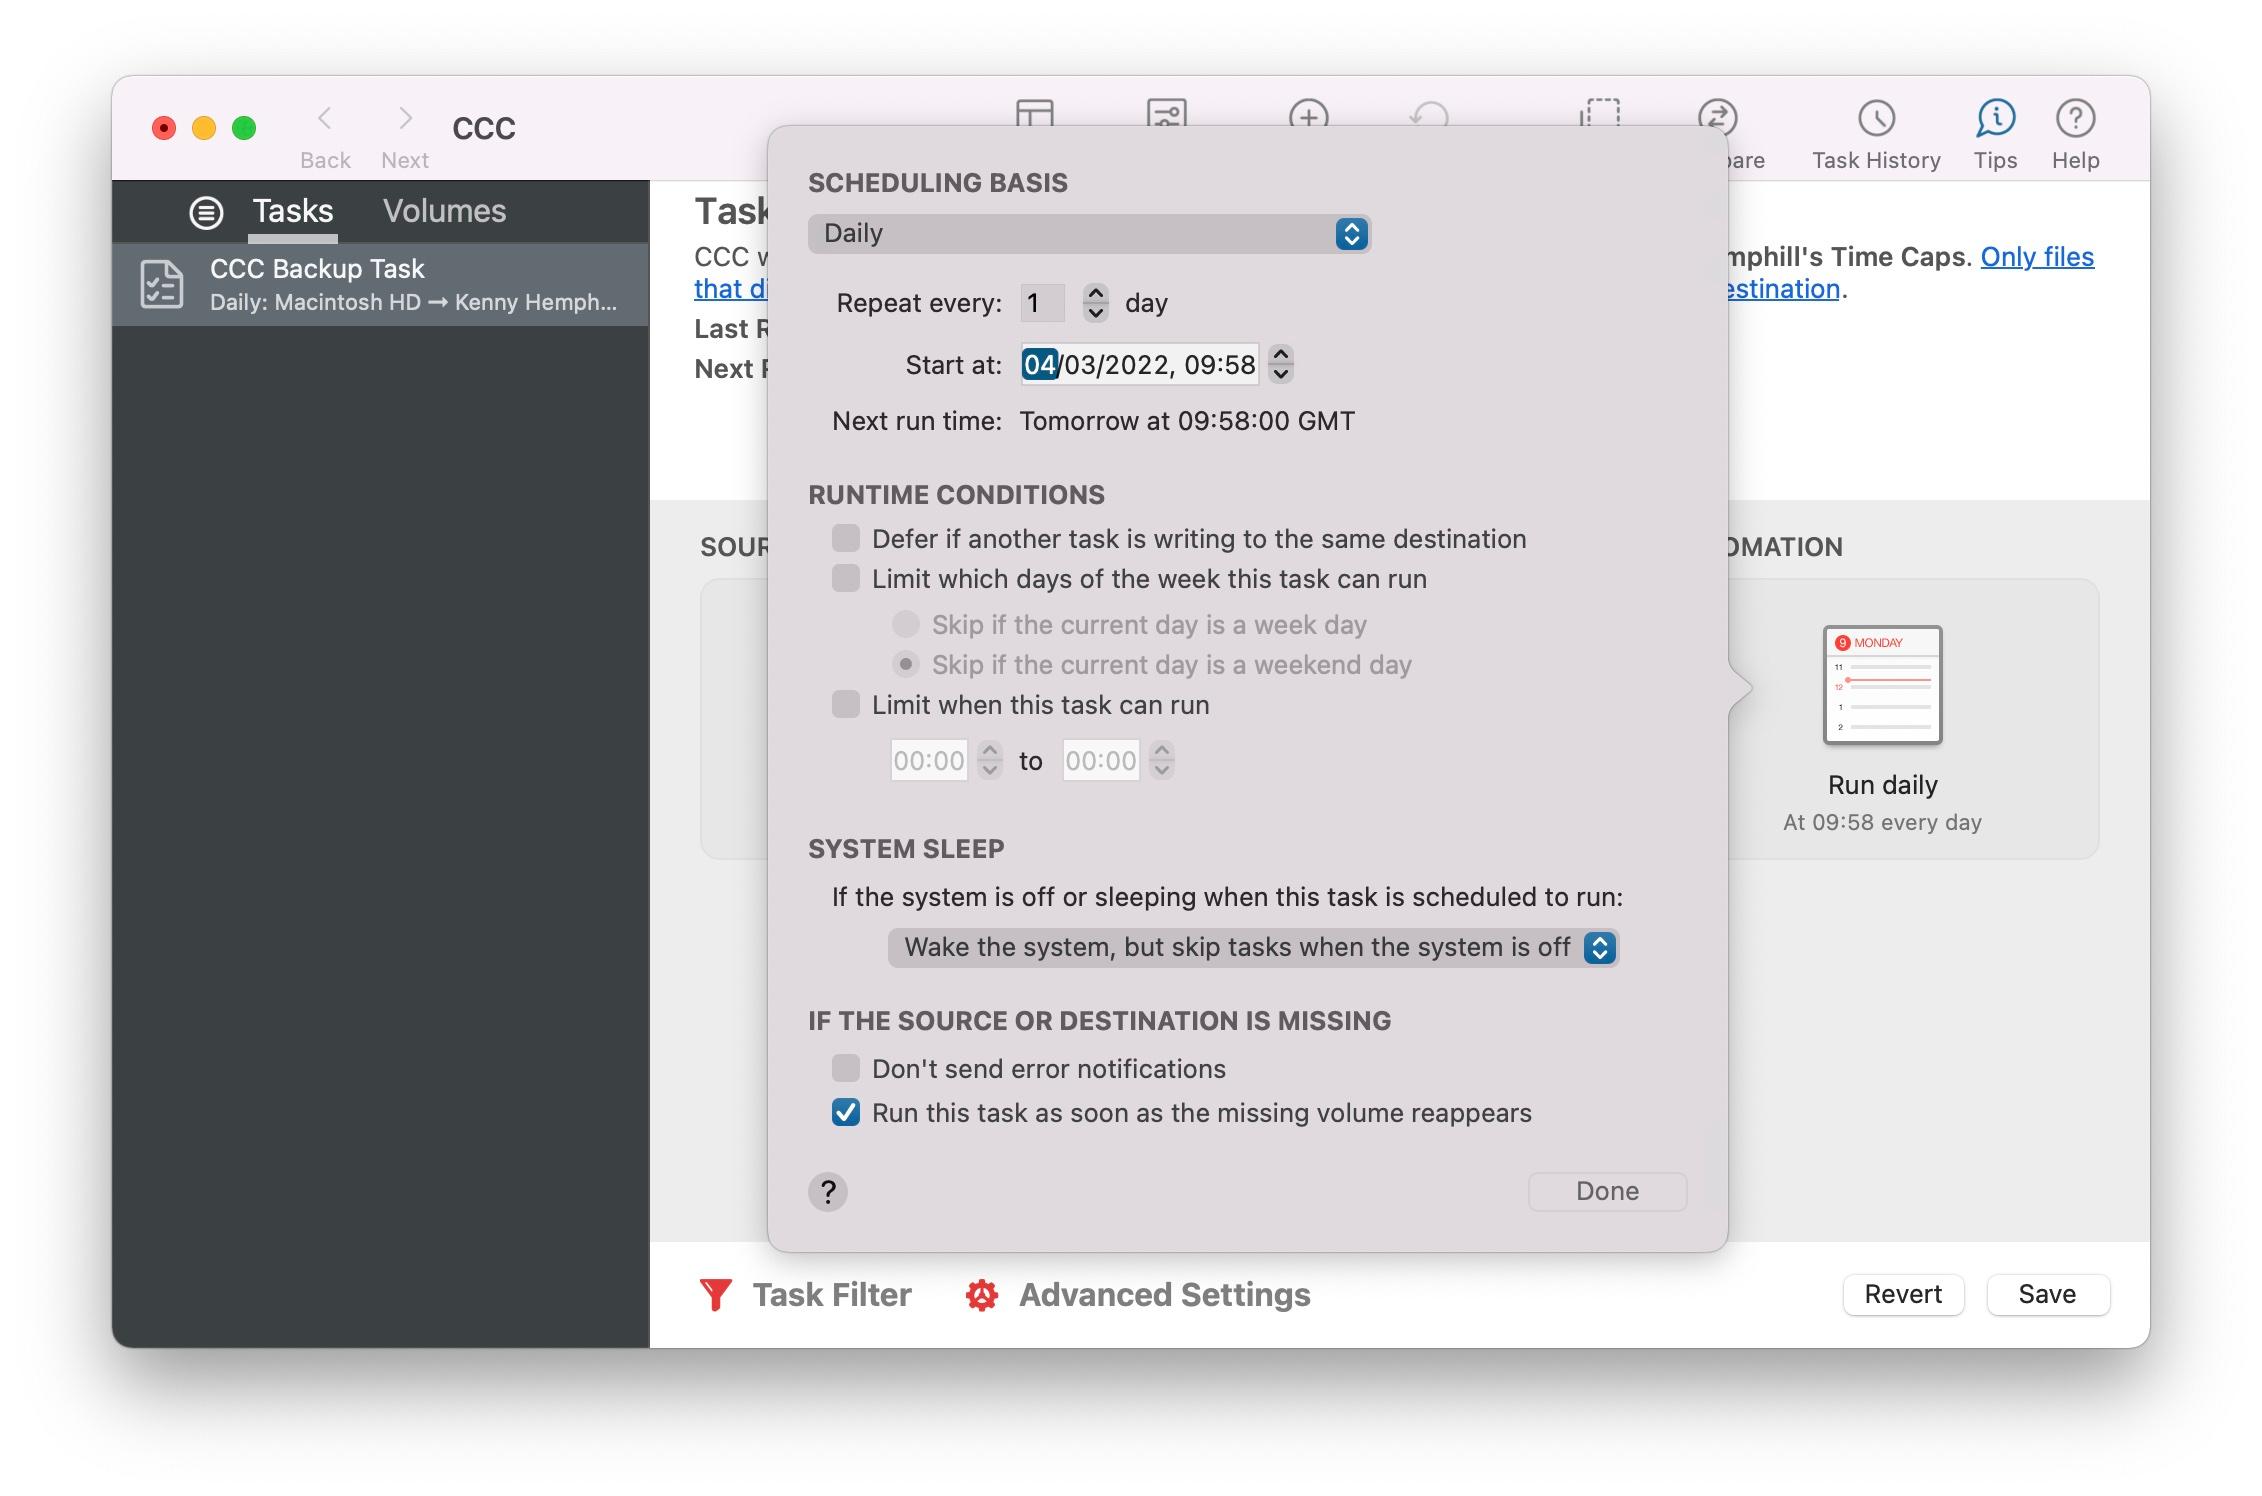
Carbon Copy Cloner is primarily a tool for creating bootable clones of your Mac’s startup drive, hence its name. However, it has evolved to become a great deal more than that and now offers features that are a match for the best backup tools. There’s also a new progress indicator and a watch folder tool that allows you to specify a folder to be watched so that as soon as its contents changed, it’s backed up.
You can back up your Mac, or files and folders on it, to a local drive or one on a network. Backups can be scheduled to run at set times or triggered by events, such as plugging in a drive. And, as you would expect, backups are incremental, replacing only the files on the destination that have changed on the source since the last time.
Version 6 added a bunch of new features including a new snapshot navigator, a new and faster file copier, the ability to pause backups and an improved dashboard for the menu bar item.
Backup sets are managed using what Carbon Copy Cloner calls Tasks. A task could be cloning your entire hard drive or, for example, backing up your iTunes library or Documents folder.
Tasks can be scheduled individually or grouped and run simultaneously. You can even easy chain tasks to create a sophisticated backup routine. Tasks can be viewed in the Task History window and you can filter by task name, source, destination or run date.
Carbon Copy Cloner is, for the most part, very easy to use, and if the hand holding becomes an irritant, you can switch off the tips feature. When it comes to restoring individual files and folders, however, it’s less obvious than some of its competitors. The quickest way to restore is to mount the cloned volume and drag and drop files in the Finder. You can also create a task to copy files.
As a tool for both cloning disks and backing up data, Carbon Copy Cloner is first rate. For pure backup, however, Acronis True Image is a better bet.
Carbon Copy Cloner has a 30-day free trial and costs $39.99/£31.05 after that.
Carbonite Safe
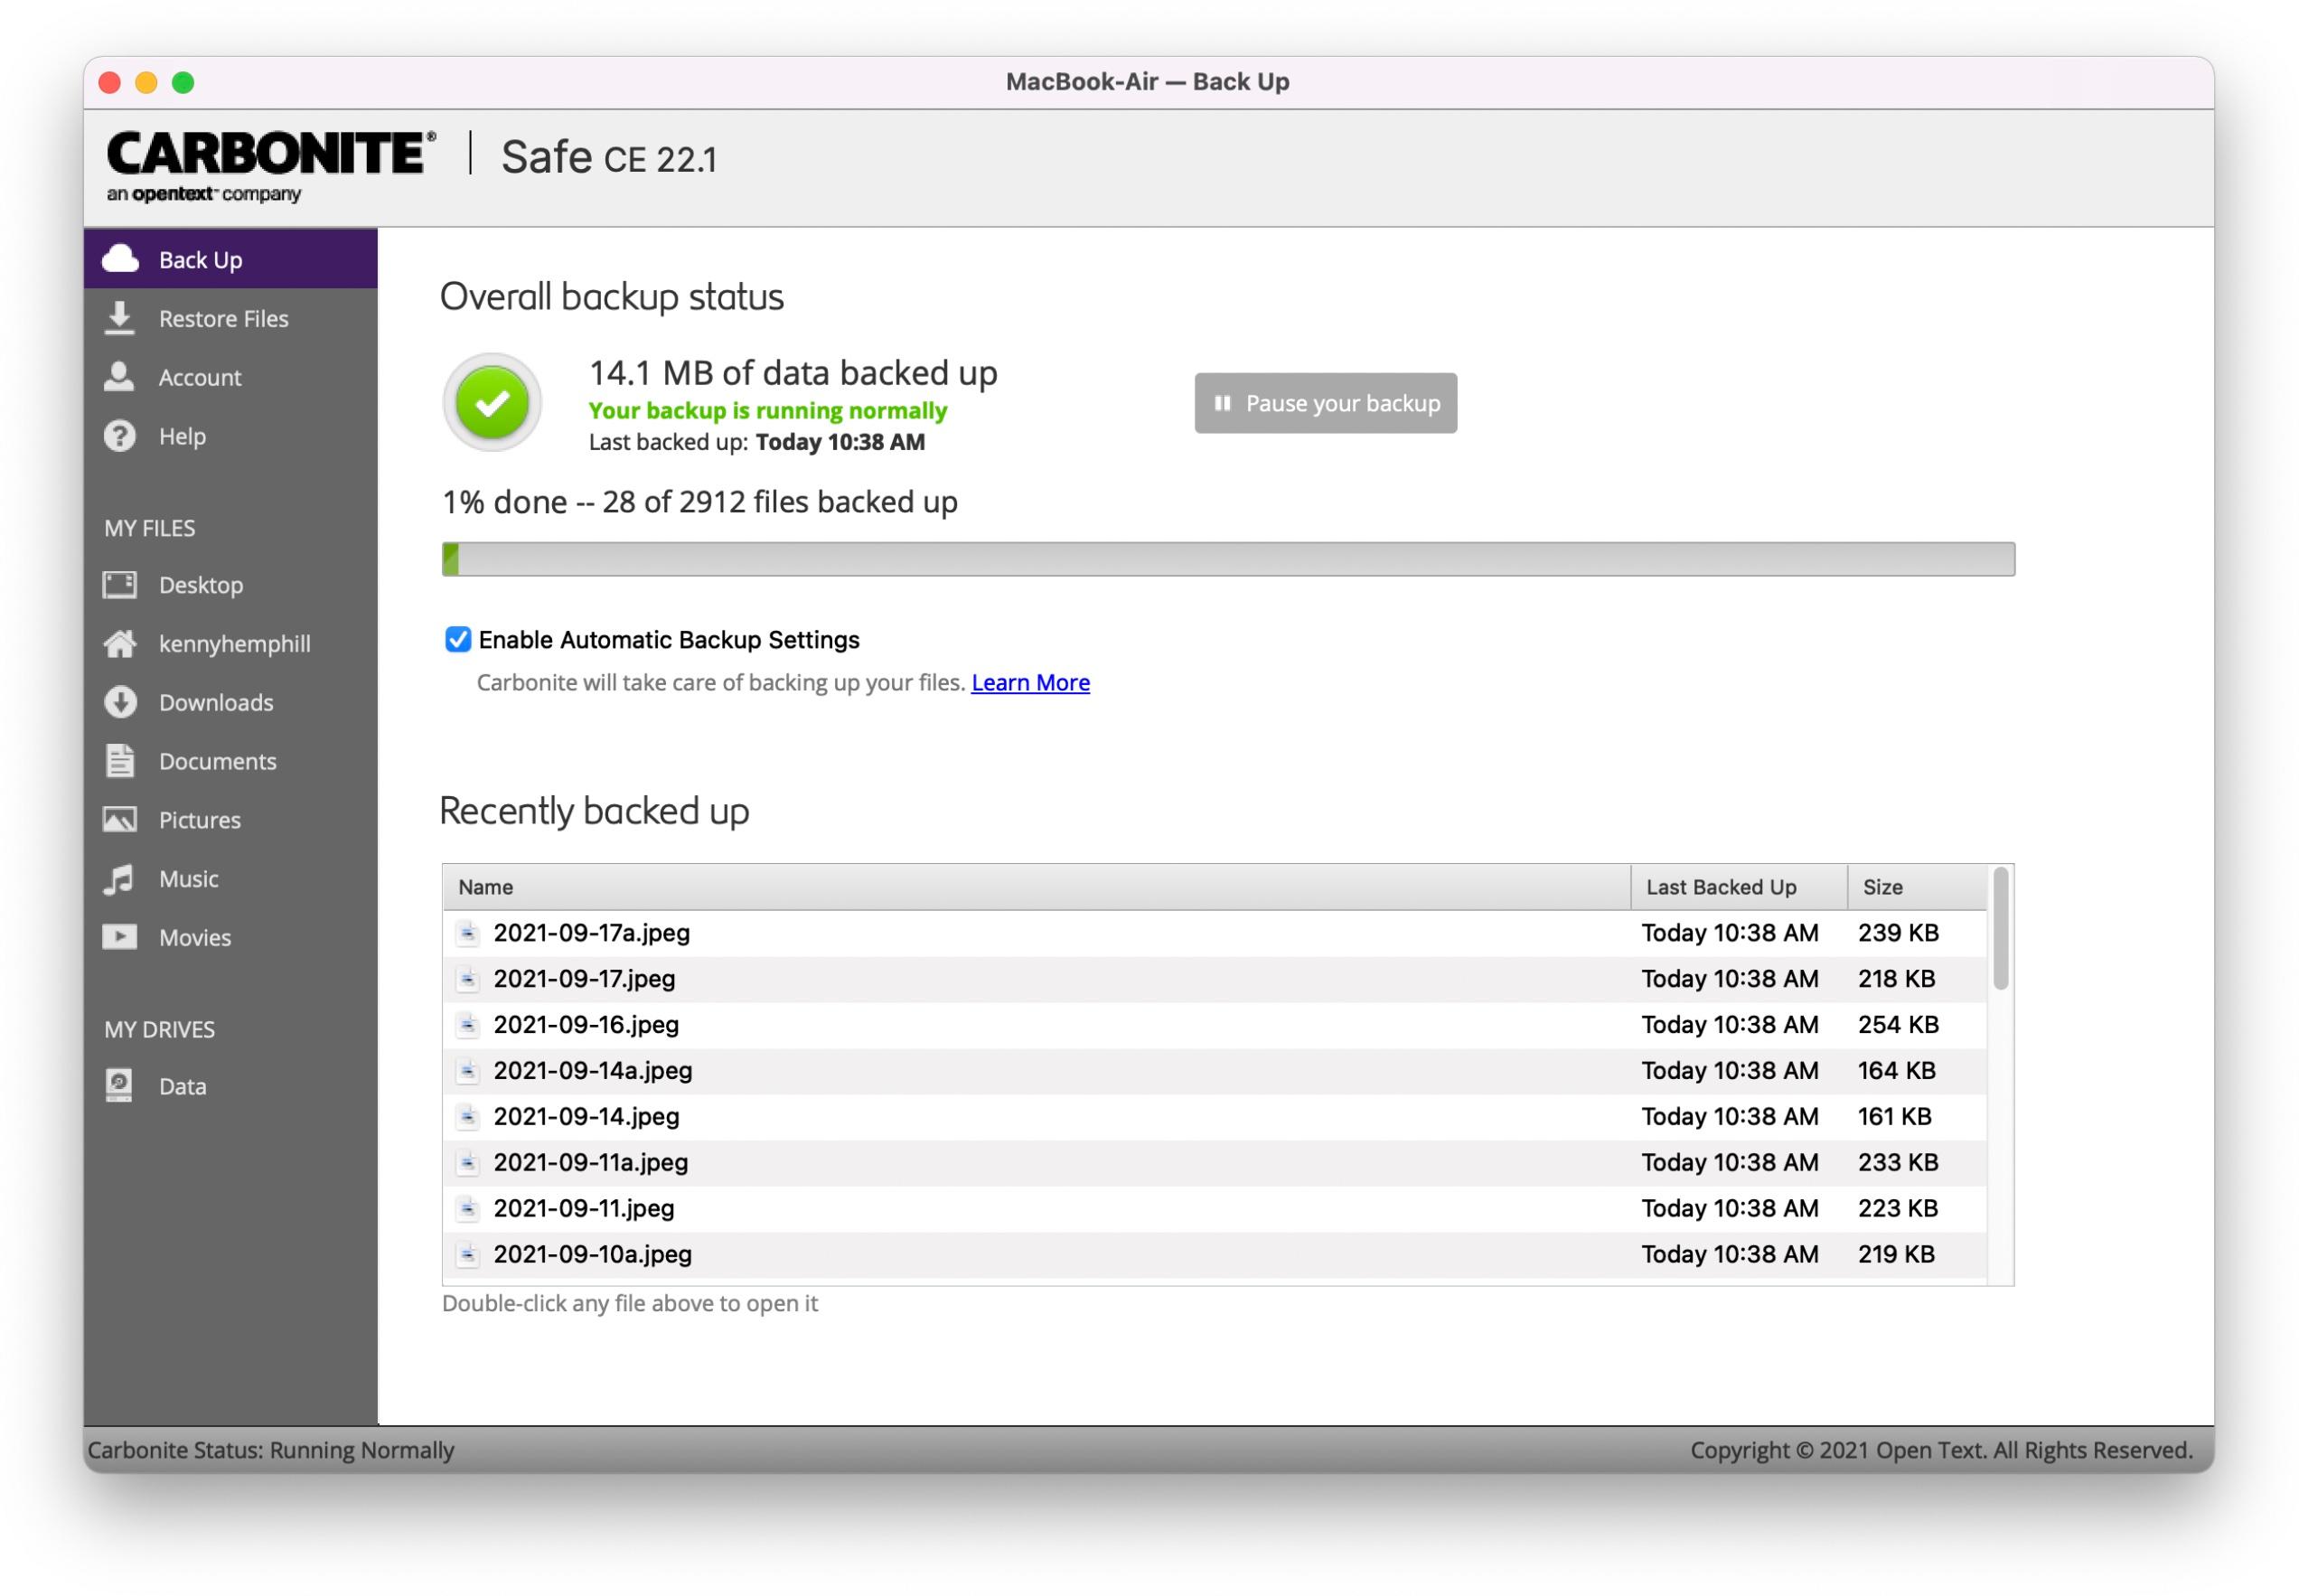
Carbonite is very similar to Backblaze in that it allows you to back up your Mac to remote servers and recover files when you need to. Like Backblaze, you sign up for an account and download a Mac application, and it automatically selects files to download.
Also like Backblaze, Carbonite doesn’t back up applications or system files. One key difference is that Carbonite’s basic plan doesn’t automatically back up the contents of your Movies folder either – although you can select videos manually to be backed up. Neither does Carbonite back up the contents of external drives.
Files are protected with 128-bit encryption, but there’s no option to add your own password.
Restoring data is done online, using the Carbonite application – the option to ship media containing your data is only available within the US. And you can restore from any backup run within the last 30 days, allowing you to roll back to earlier versions of files.
The Carbonite mobile app allows you to view and download files to an iPhone or iPad.
Carbonite is very simple to use. In fact, it almost feels too simple. Download the app, install it and launch it, and Carbonite starts backing up your Documents and Pictures folders straight away.
In the left-hand sidebar, there’s a list of volumes and the main user folders (Desktop, Documents, Pictures, Movies and Music). By clicking on those you can select files to be backed up or excluded.
Restoring files is just as easy. If you want to restore a complete backup, click the Restore option in the sidebar and choose whether to download files to a folder or put them back where they were originally.
To restore individual files and folders, navigate to them using the folders in the sidebar and choose the download option.
Carbonite, at the time of writing starts at $71.99 (approx £55) per year for a single computer. If you want to back up external drives and back up videos automatically, that jumps to $111.99 (approx £86). That makes it expensive compared to its nearest competitors.
MSP360 CloudBerry Backup
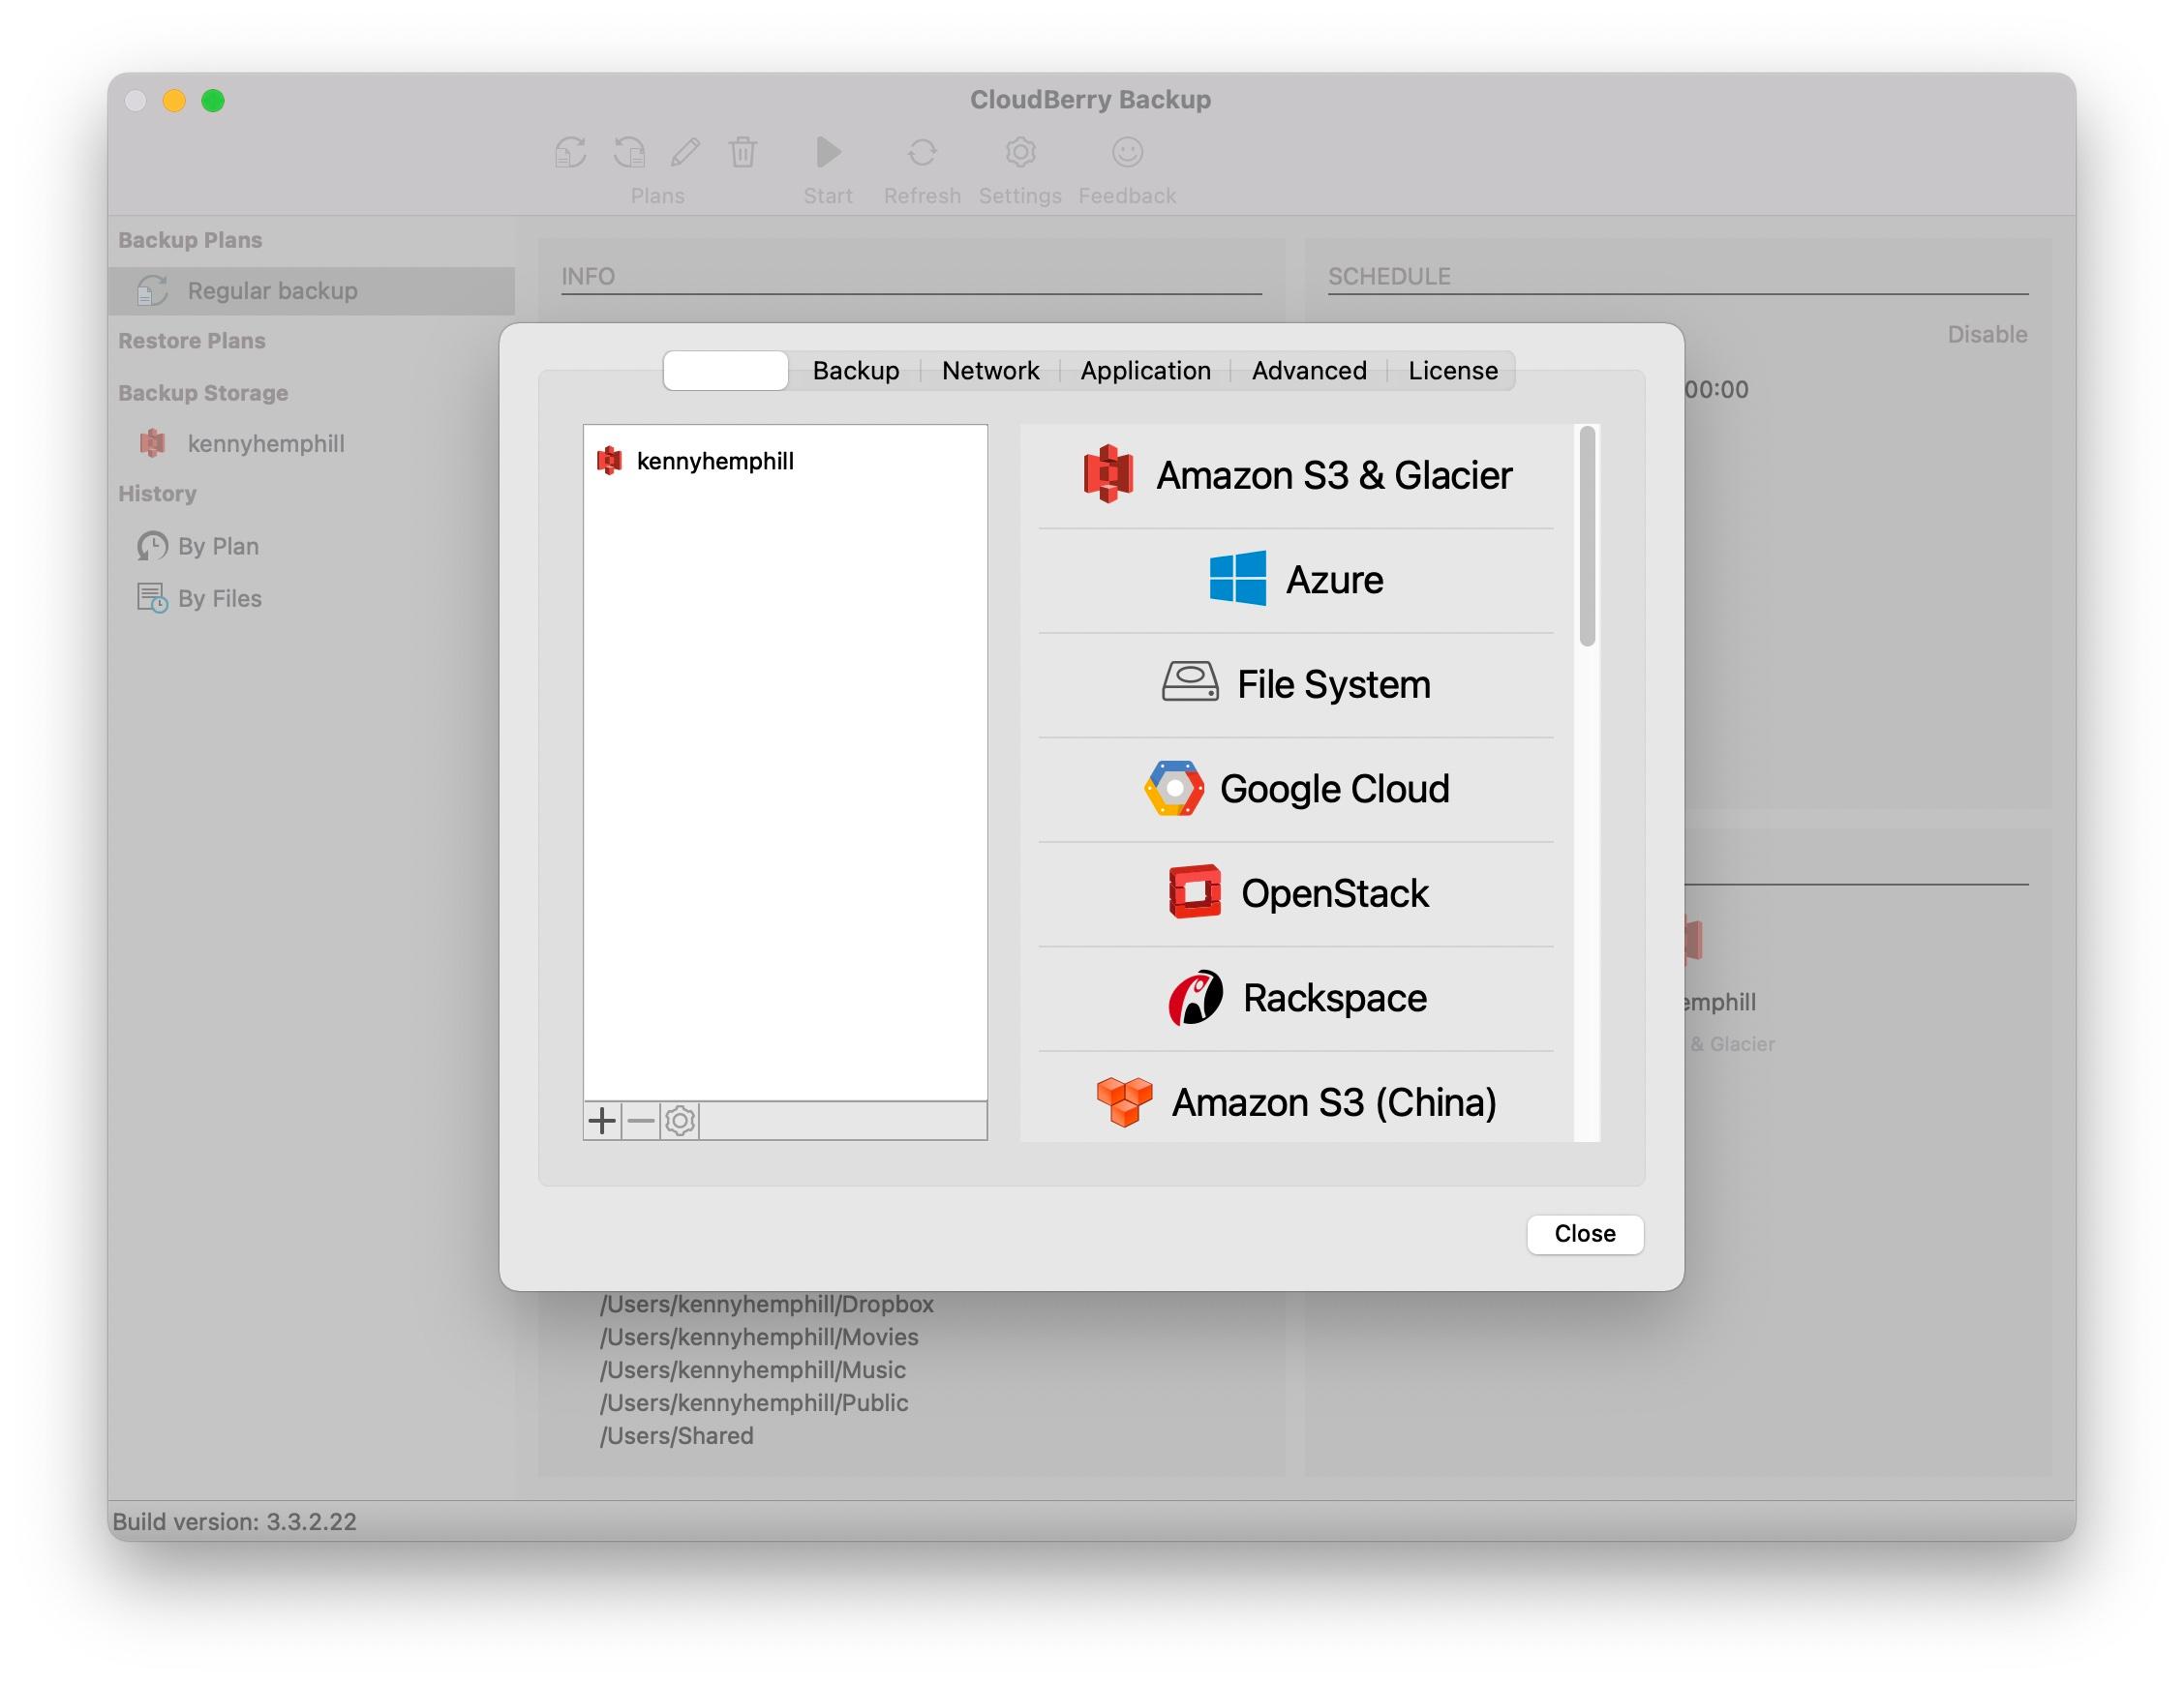
CloudBerry Backup is a remote backup tool designed for home users and small business. It’s made by the same company that makes the MSP360 managed backup service that is aimed at larger business and enterprises.
The Mac version of CloudBerry Backup is available in two versions: free and paid. The free version has most of the features of the paid version, with the exception of the ability to compress and encrypt backups. For those features, it costs $29.99 (approx £22.99) for a perpetual license for one machine. If you want to use the pro version on more than one Mac, you’ll need to buy additional licenses.
Perhaps the most significant thing to say about CloudBerry Backup is that it’s designed as a remote backup tool. This isn’t the application to use if you want to backup to a local disk or to make a bootable clone. That said, you can also set a NAS box on your local network as the destination for a backup.
NAS boxes aside, you’ll need your own online storage account to use CloudBerry Backup. It supports several, including Amazon S3, Microsoft Azure, Google Cloud, and Backblaze S2. You can also back up to an SFTP server. For the purposes of testing, we used Amazon S3.
CloudBerry Backup’s interface is anything but intuitive. There’s no simple option to choose a source and destination and set a schedule here. Those options do exist, it’s just that they are not immediately obvious. There’s plenty of help available in the documentation on MP360’s website, but again, it’s not easy to find.
The first thing to be done is to configure the service you’re going to use as a destination for your backup. That’s straightforward enough: click Settings on the main window, then choose the Storage tab and the name of the service you want to use (or File System if you want to use a NAS). Once you’ve configured the storage service with your account settings, things get much easier thanks to the assistant that steps in and walks you through the process of choosing which files to back up (you can choose them manually or based on parameters you specify) and how frequently to back them up. That becomes your first backup plan. You can set up more, with different files and schedules.
To restore data, you need to set up another plan, and there’s an assistant to help with that, too.
CloudBerry Backup does a good job and is particularly useful if you already have a storage plan with a remote provider. Once you get over the unfamiliarity of the interface, it’s easy to use. Just remember to factor in the price of your storage plan when you decide whether it’s right for you.
SuperDuper! v3.5
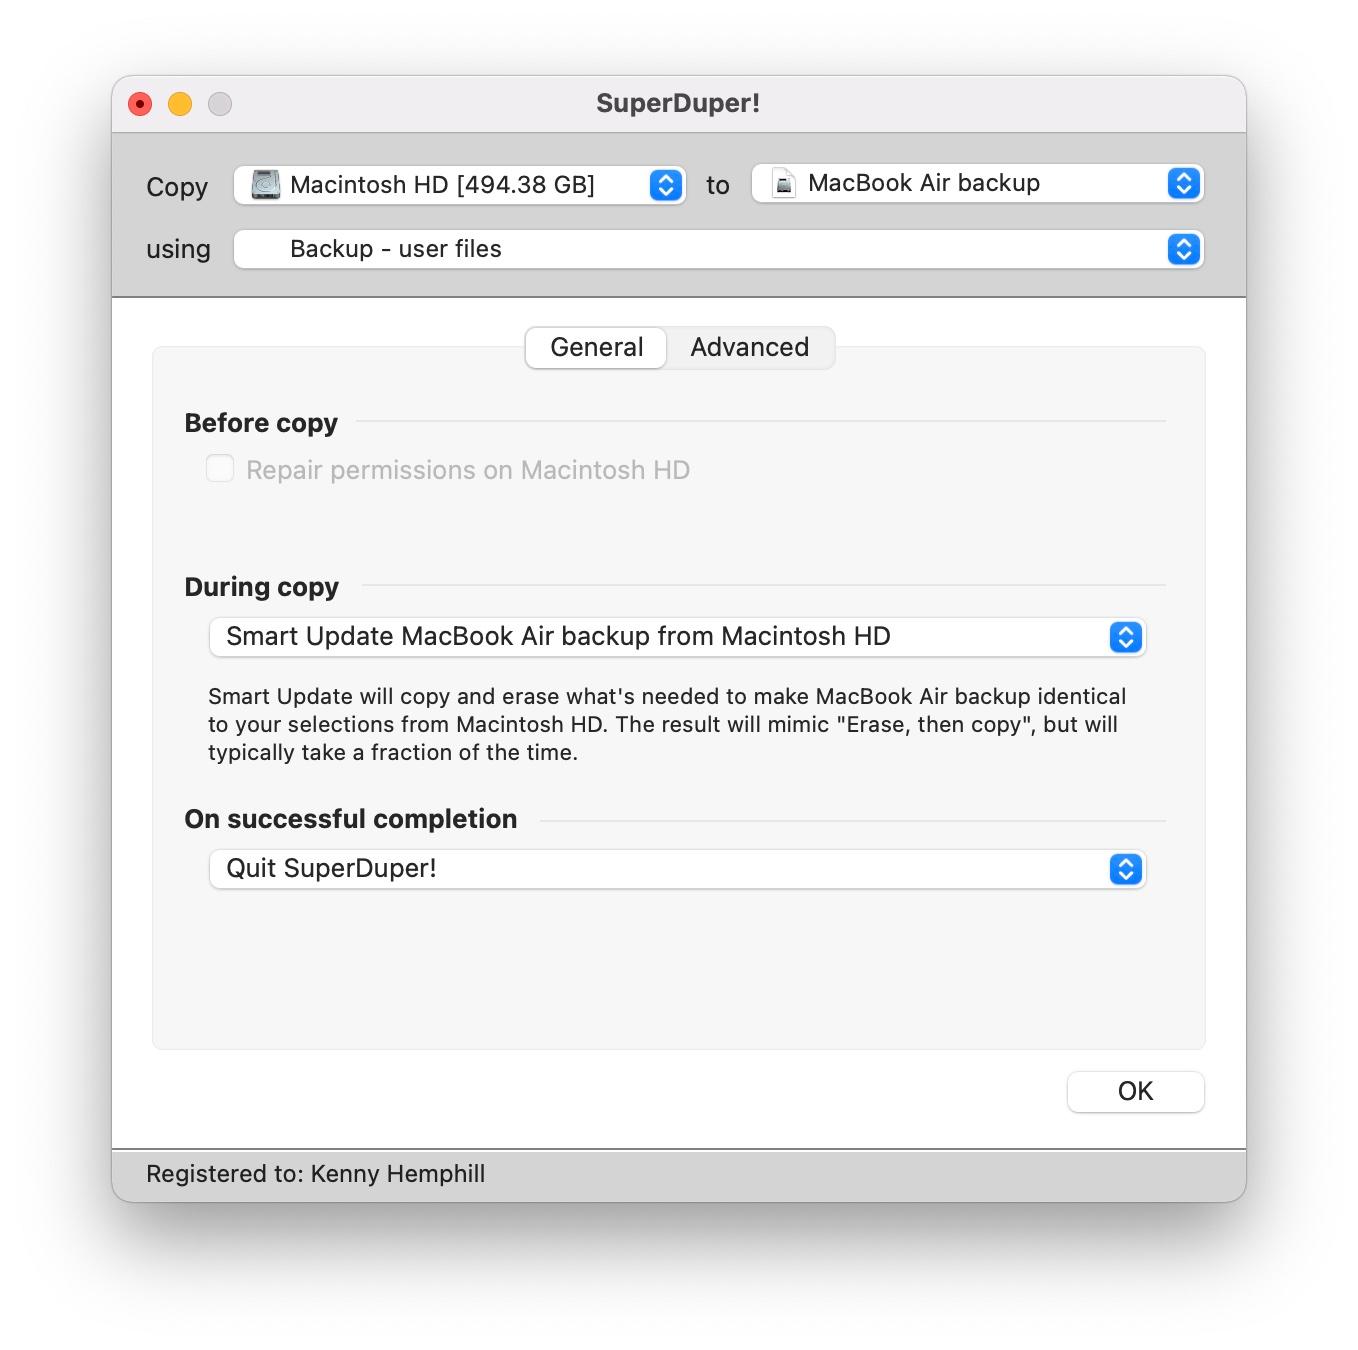
Like Carbon Copy Cloner, SuperDuper allows you to make bootable clones of your Mac’s hard drive to an external disk or disk image.
If you use Time Machine for regular backups, SuperDuper can clone and Smart Update Time Machine backups. You can’t easily choose which files and folders to back up – the available choices in SuperDuper’s menus are all files or all user files. However, you can dig deeper into its options and build your own backup scripts by pointing and clicking.
The latest version of SuperDuper adds support for creating bootable clones on Big Sur and Monterey Macs and is Apple silicon native. It also adds support for Notification Center and has a feature that allows you to copy files from a Finder extension. SuperDuper can also create and copy from snapshots on APFS drives.
SuperDuper’s Restore section allows you to access those snapshots at the click of a menu and recover your Mac to whichever recent snapshot you choose. And if you use an APFS volume as the destination for your clone, you can use snapshots on the clone, too. That means, for example, if you install an update then Smart Update runs and updates the clone to reflect the software install, you can roll the clone back to just before it updated, if something goes wrong.
SuperDuper is a good option if you already use Time Machine to run regular backups. If you run SuperDuper alongside it, you have a ‘belt and braces’ backup strategy. If you need to recover individual files, you can use Time Machine, but if disaster strikes and your hard drive is unusable, you have an up-to-date clone ready to boot from, thanks to SuperDuper.
In use, SuperDuper isn’t as user-friendly as Carbon Copy Cloner – it doesn’t, for example, guide you step by step. However, it makes keeping an up-to-date clone of your system reasonably straightforward and does a good job. If you like the idea of the snapshots feature and are comfortable with its interface, this is a good choice.
SuperDuper can be downloaded and used for free. However, for £26.24/$27.95, you can unlock features like scheduling, Smart Update, and scripting.
MacBackup Guru
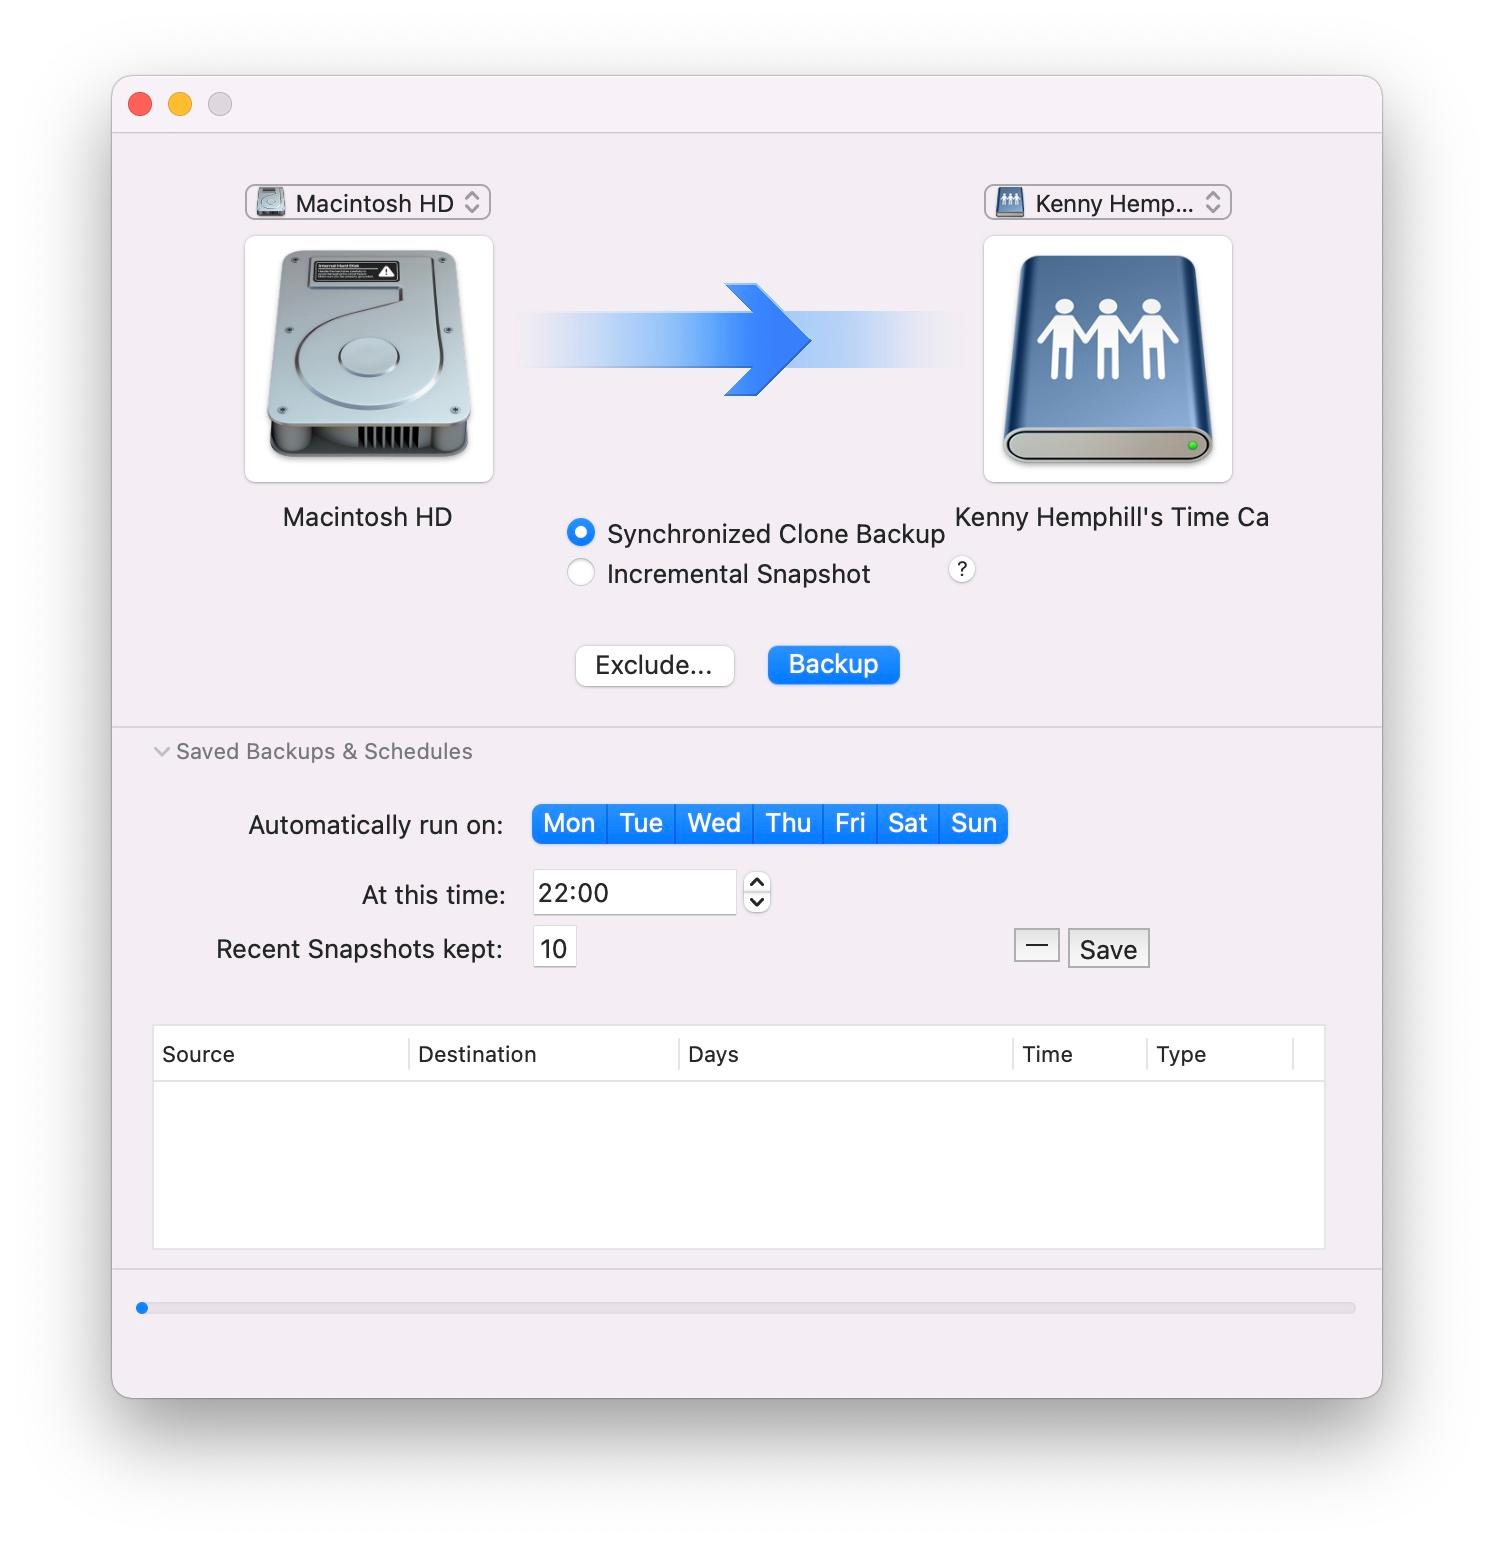
Mac Backup Guru’s prime function its to create bootable clones of your Mac’s startup disk. However, it can also synchronise backed up versions of your disk, or even of just a folder, with the current version. And it can create snapshots, just like Time Machine does. So, for example, if you set it to take a snapshot on a regular schedule, you can then revert to whichever snapshot you choose.
You can also choose which folders to backup and to where, rather than having to backup a whole disk to your Time Machines disk and then designate folders to exclude. There’s more control over scheduling that Time Machine offers, and, of course, Apple’s utility doesn’t offer the ability to synchronise folders or create bootable clones.
While the snapshots feature is similar to Time Machine, Mac Backup Guru offers more control. You can, for example, browse snapshots in the Finder, rather than having to use the Time Machine utility to restore files.
It supports APFS formatted disks, though if you want clones to be bootable you should format them as HFS+.
Mac Backup Guru’s interface is simple, and will be familiar if you’ve used some of the other tools listed here. However, some of the menu buttons, notably those for choosing source and destination, seemed small and cramped to us. We’d have liked those menus and the options contained within them too have been a little bigger to make them easier to select from.
Once you’ve chosen a source, which can be a whole volume or a specific folder, and a destination, you can elect to exclude folders within that from being backed up. You can also schedule automatic backups. The scheduling is fairly basic, but that means it’s also easy to configure. Just click the days on which you want the backup to run and the time you want it to run. It’s worth noting that while you can run the backup on which ever day you choose, you have to run it at the same time each day. You can also run ad-hoc backups by pressing the ‘Backup’ button on the main window.
The final option is to choose how many snapshots to keep. Once you reach the specified number, Mac Backup Guru will start deleting the oldest snapshot every time a new one is created.
Mac Backup Guru is an easy to use backup tool that keeps options and settings to a minimum while offering several useful features. It’s also good value – at the time of writing it was on offer for less than £7.16/$9, a significant discount on its usual £23.05/$29 price.
